New Users: Quick Start Guide
Welcome to the New Users: Quick Start Guide, where we’ll help you configure your mobohubb account from scratch. Once you’ve completed all five steps—Branding, Scan Point, Task, Form/Checklist, and Invite Your Team—you’ll be ready to manage your deskless workforce effectively.
In this quick start guide you'll learn:
- How to complete the Setup Wizard after your first login
- How to customize your brand, including logos, colors, and time zone settings
- How to set up scan points (QR/NFC) and link them to tasks or forms
- How to configure tasks for your deskless workforce and enable optional GPS tracking
- How to create forms and checklists, add fields, and manage advanced options
- How to invite your team and assign roles (e.g., Organization Administrator, Site Administrator)
- How to complete your final setup so the portal and app are ready for use
After Logging in for the First Time
When you log in for the first time, the Set-up Wizard will open. This assists in configuring the application quickly and correctly. Here are the steps to complete the Wizard:
-
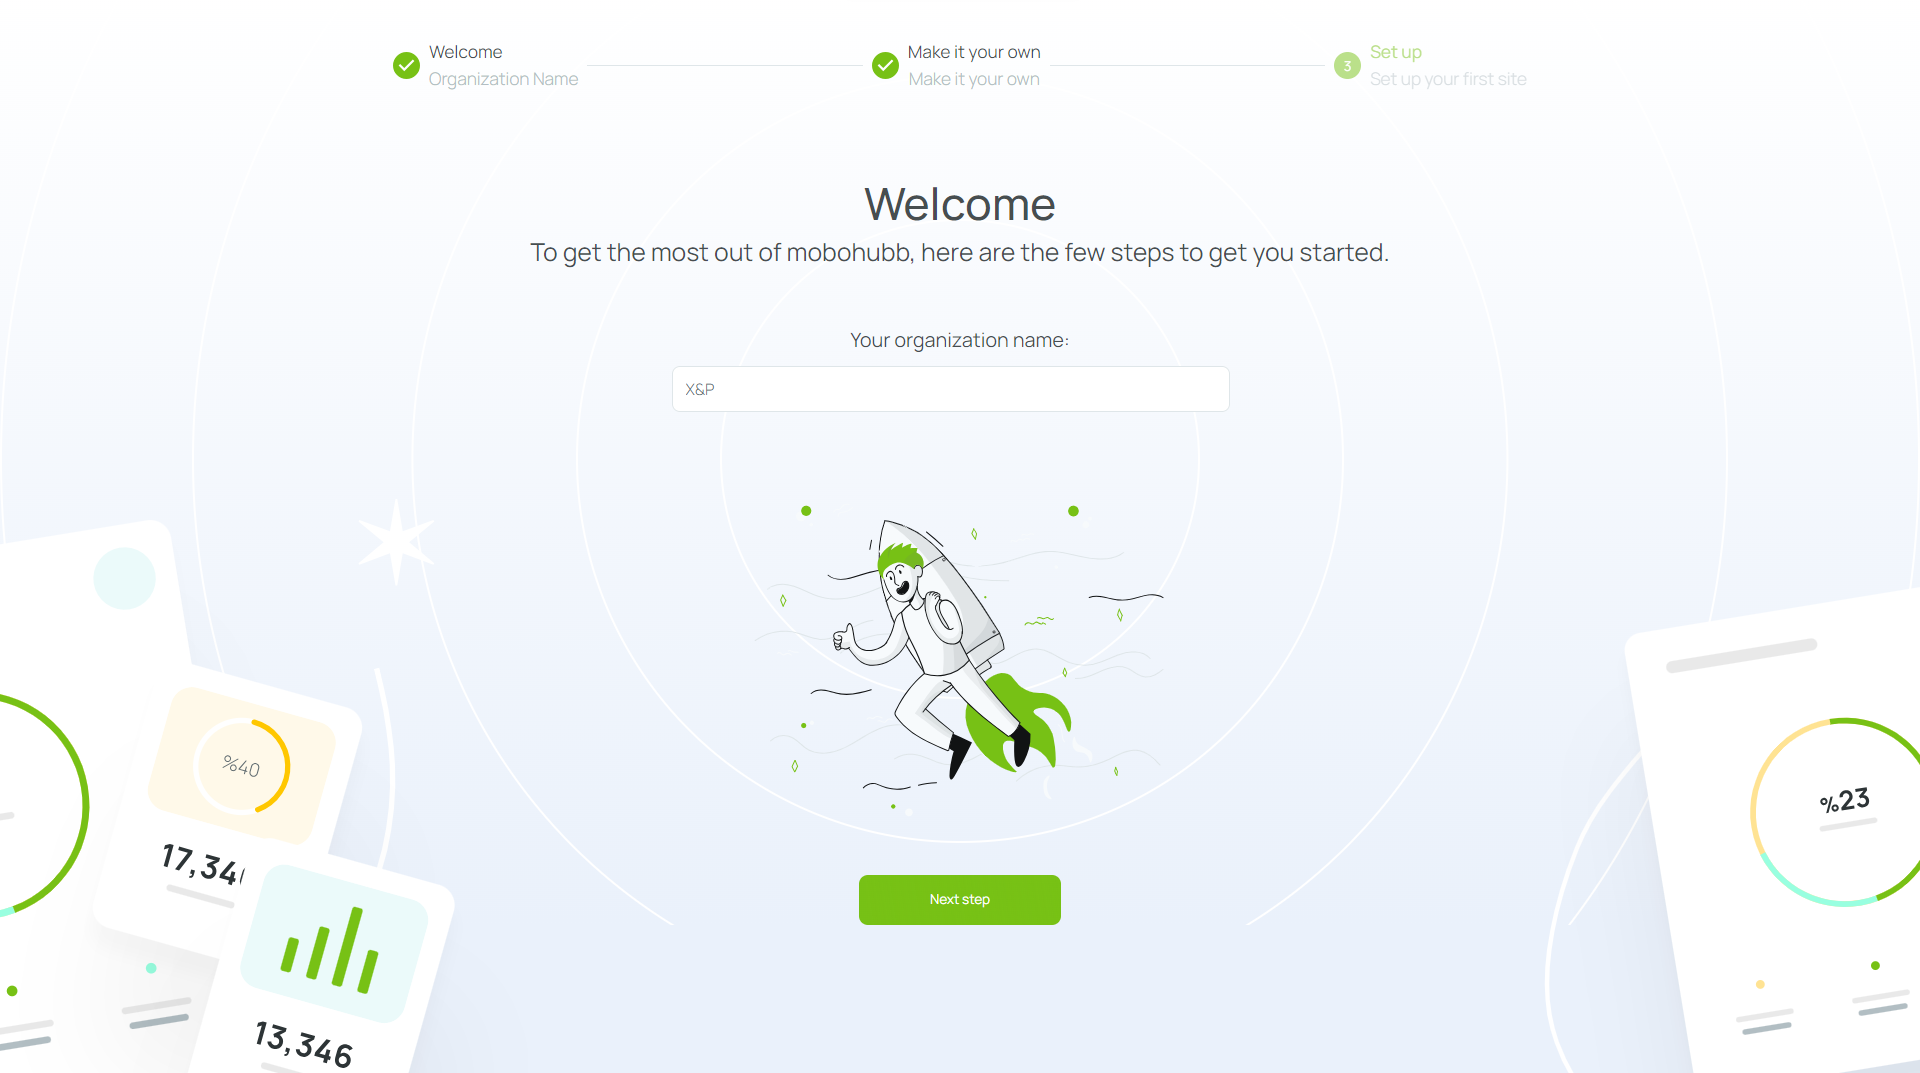
Welcome
- Confirm the name of your organization in the text box.
- Click on the Make it your own interface to customize the portal’s appearance and functionality.
-
Make it your own
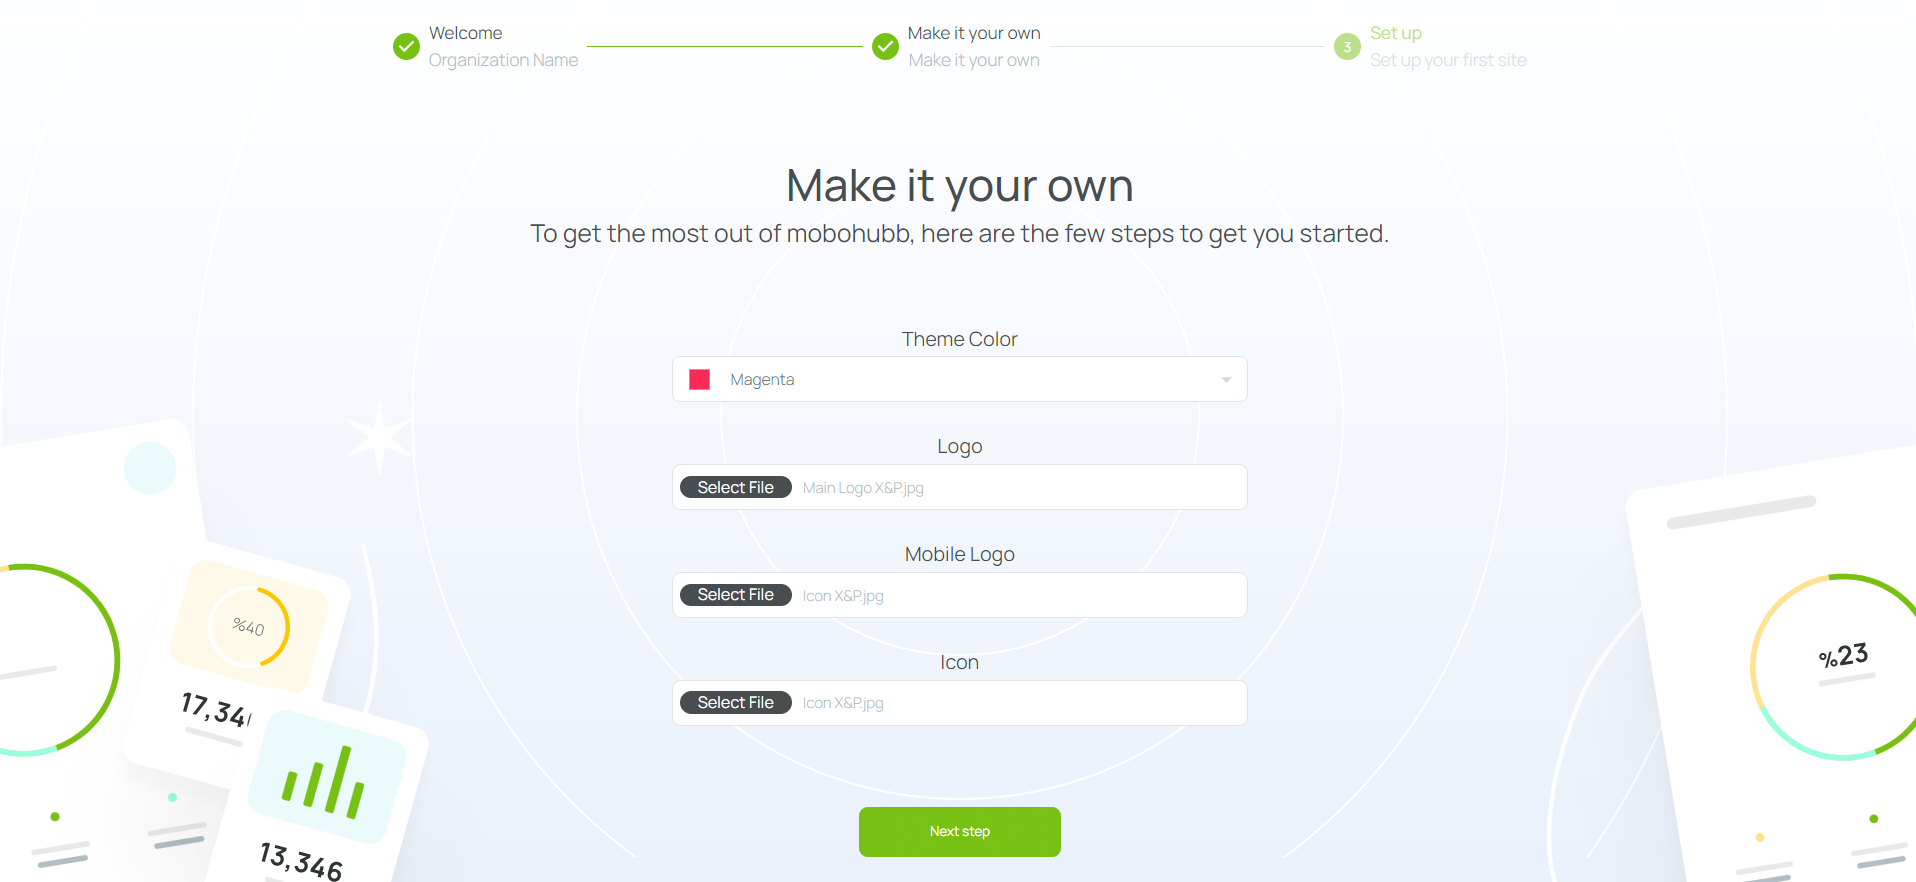
- Choose a color theme for your app. This theme affects the background, icons, and fonts in the portal and mobile app.
- Upload your logo file (JPG or PNG). This will appear in the top-left corner of the portal.
- Upload your mobile logo file (JPG or PNG). This will be displayed in the mobile app.
- Upload your icon file (JPG or PNG). This icon appears in the top-left corner of your app when the menu collapses.
- Click on the interface in the Set up section to configure your first site.
- Set up
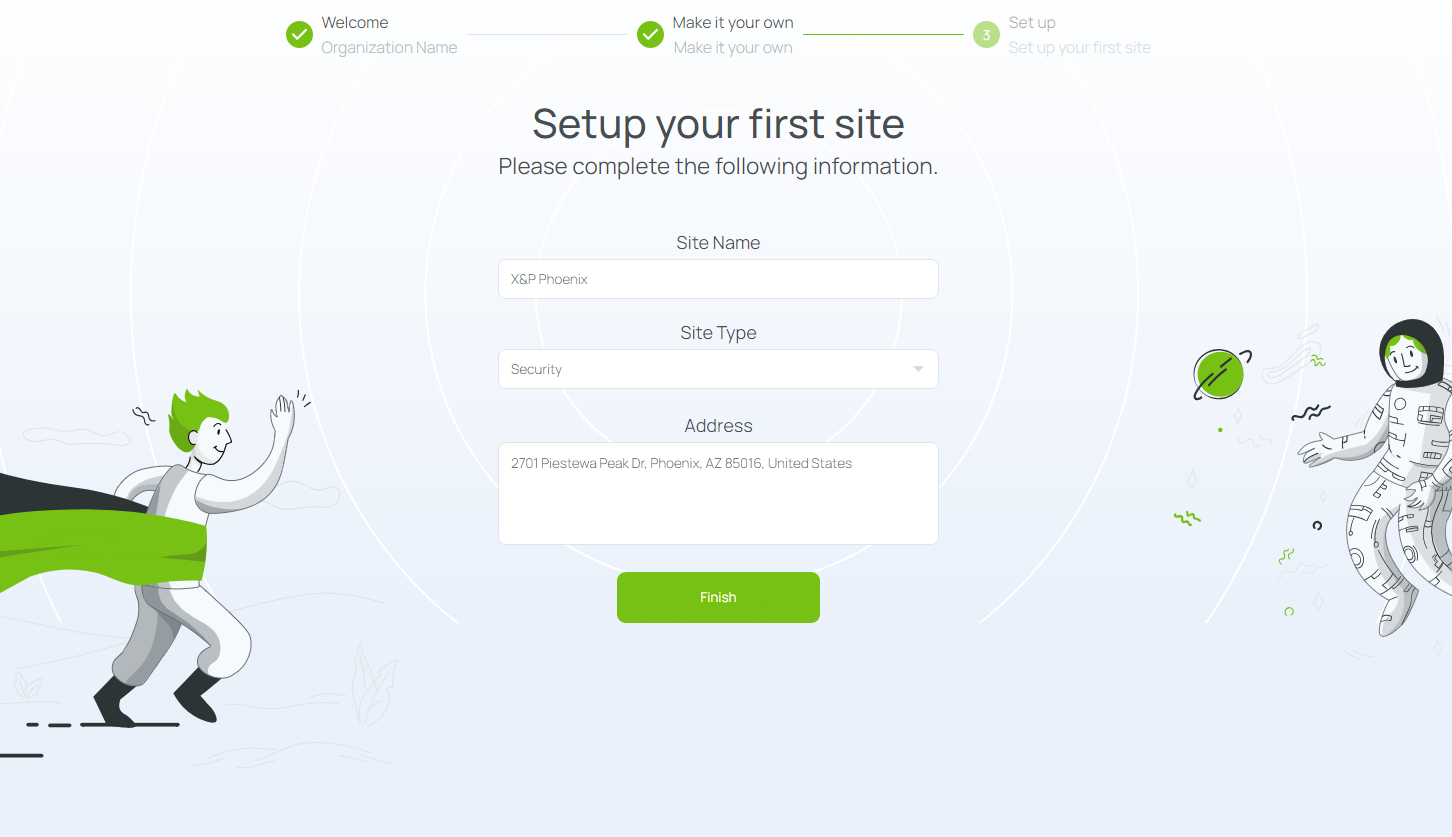
- Site name: Enter a name that identifies your site.
- Site type: Select from security, facilities, cleaning, construction, restaurant, or choose Other if none matches. This will prepare your site with some pre-defined configurations according to your selection.
- Site address: Enter the physical or virtual address where your main activities occur.
- Click Finish to save your changes and create your site. You can now fully use the mobohubb portal.
Note: If you are an existing user of our first platform and this is your first time visiting the new one, the Wizard is not available. Visit our Quick Start Guide for Existing Users to get started.
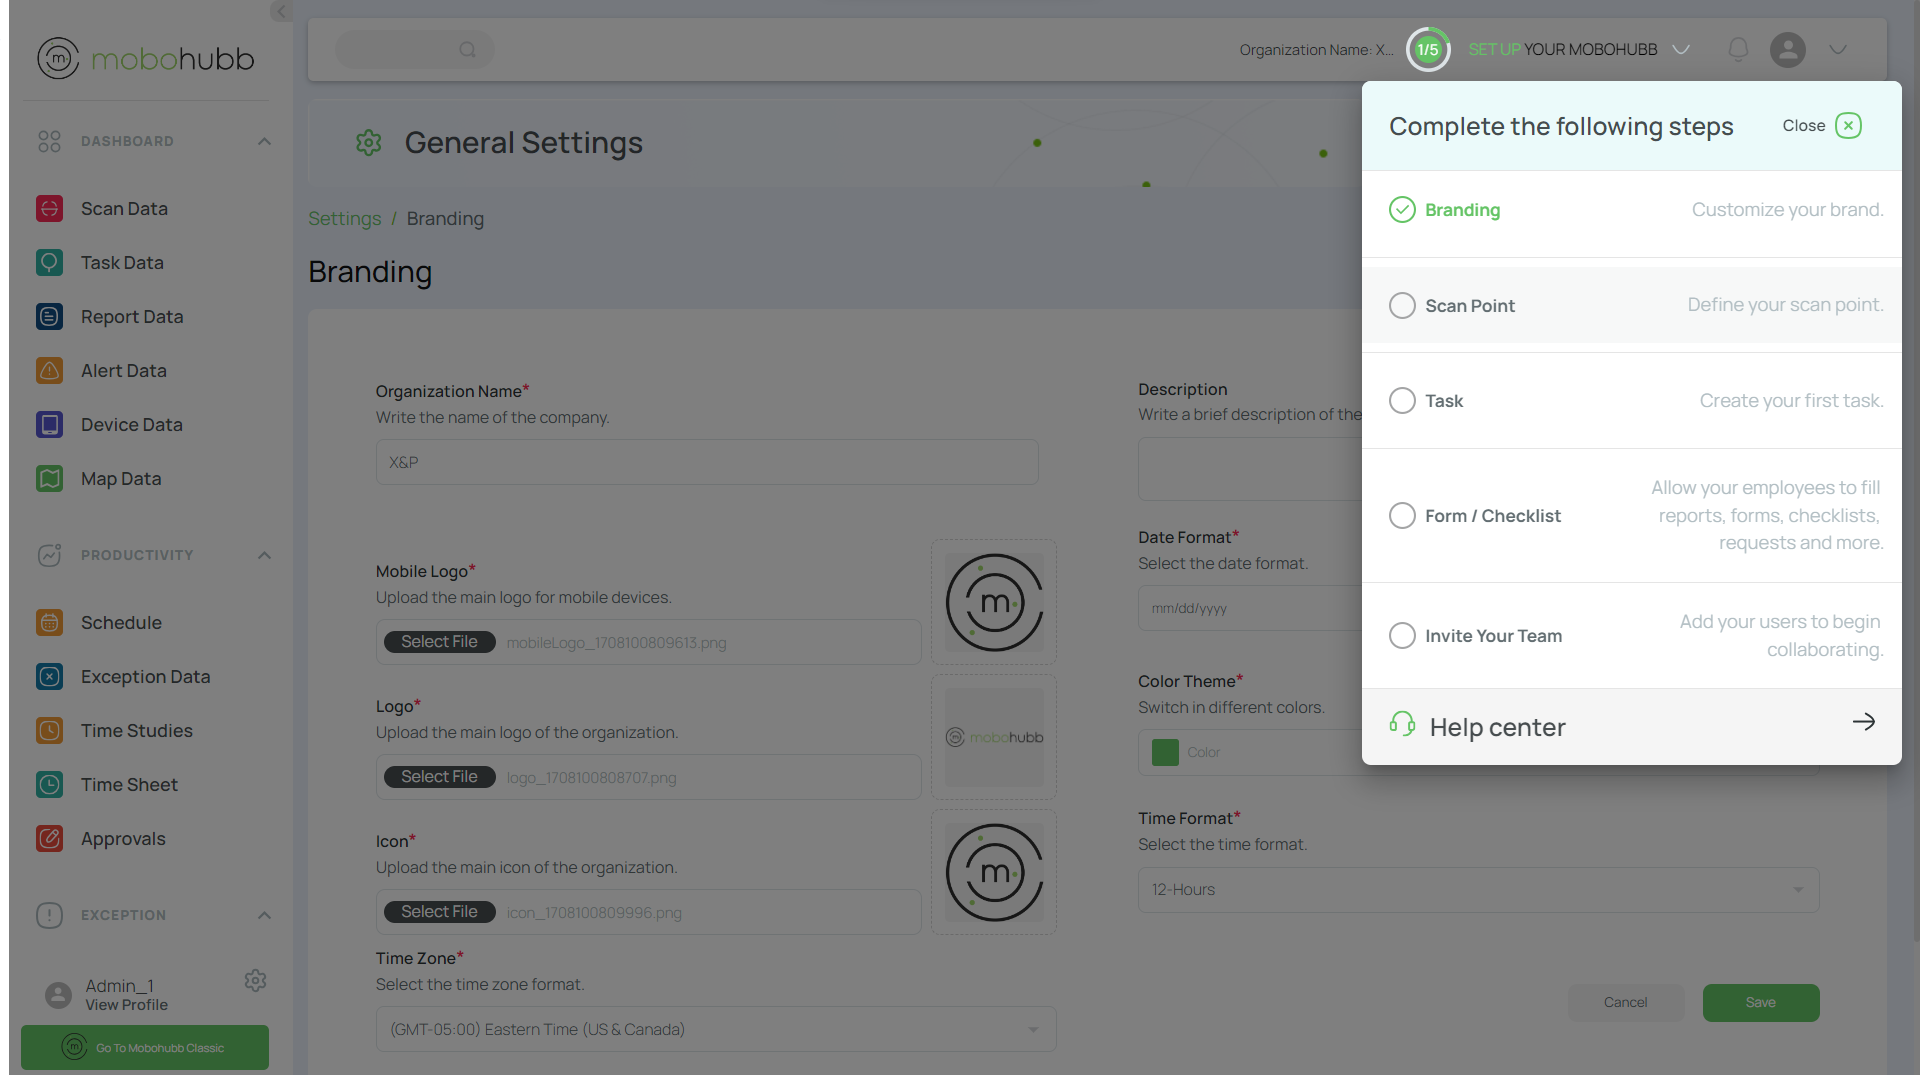
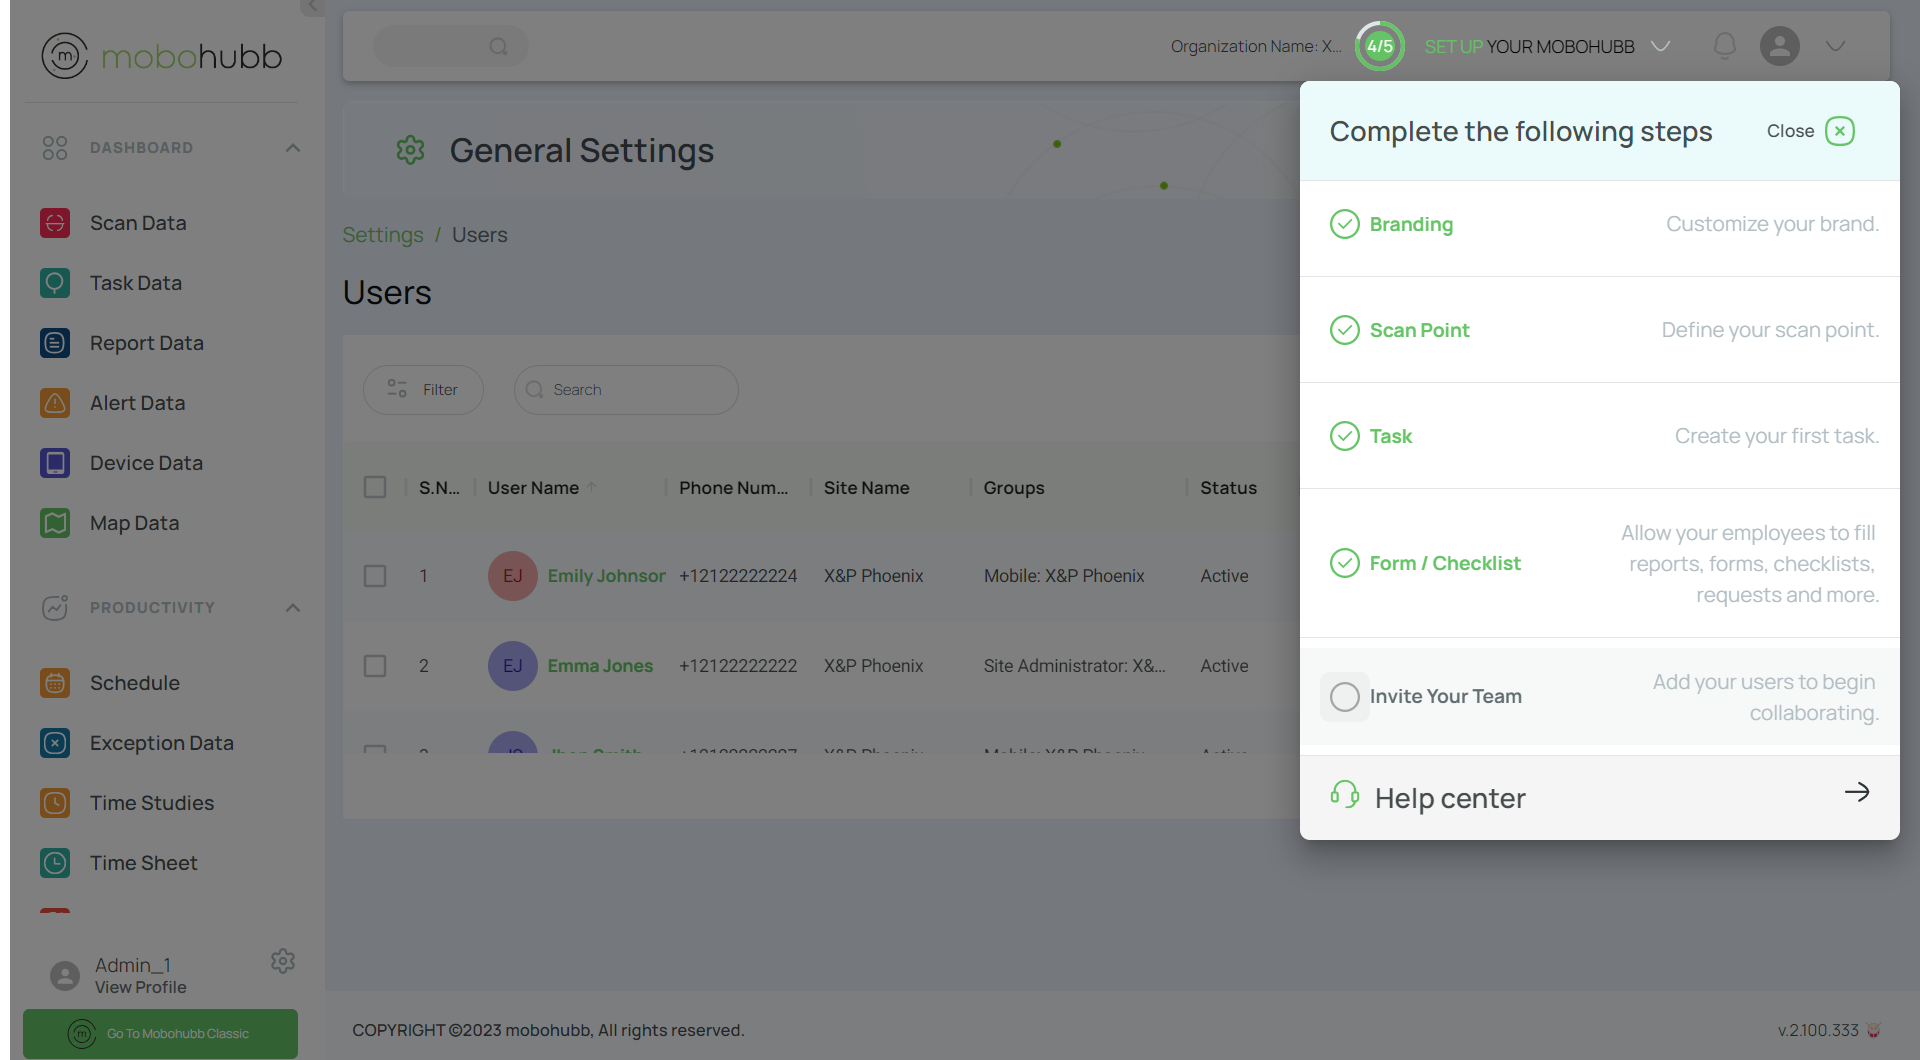
Setting up Your mobohubb
You’ll see a setup walkthrough in the top menu when you first log in. Each of the 5 steps should be completed before asking mobile users to access the app. The prompt will disappear when these steps are completed. Select the green check circle on the left side as you finish each step to mark it complete. Once you’ve finished all 5 steps, the green indicator will disappear, and your mobohubb menu will be fully set up.
Customize Your Brand
The first step assigns your organization logos, icons, and other branding details. By default, these apply to all sites; however, you can customize each site’s branding if needed.
-
Click on “Branding”.

-
Fill in the branding fields as needed:
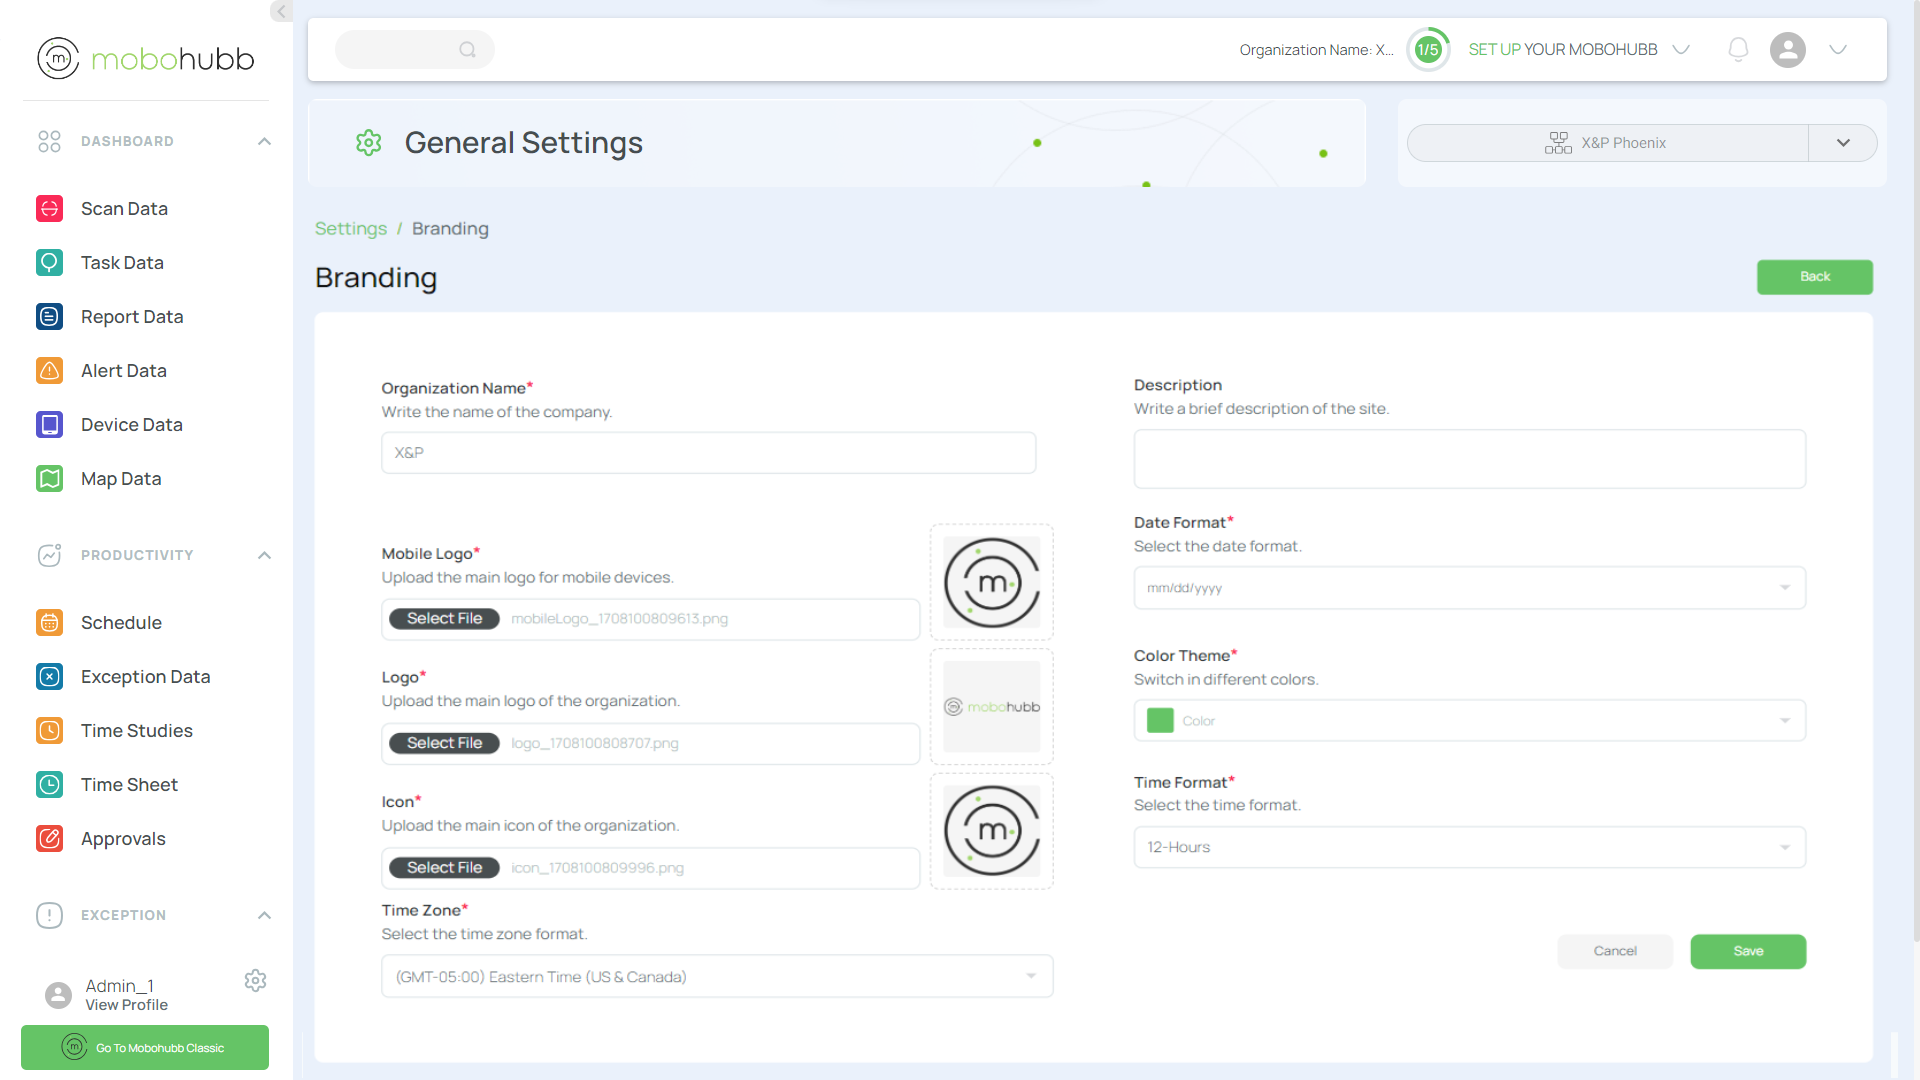
- Description: A brief text introducing the organization’s purpose or value.
- Logo app mobile: The graphic symbol displayed in the mobile app interface. (JPG/PNG)
- Icon: The icon shown in the top-left corner of your app when the menu collapses. (JPG/PNG)
- Main logo: The primary graphic symbol for the organization on the portal. (JPG/PNG)
- Date format: Choose how dates are displayed (e.g., dd-mm-yyyy, mm-dd-yyyy).
- Time format: Select 12h or 24h format for time logs.
- Theme color: Set the main color for your portal’s interface.
- Time zone: Specify the time zone for displaying time-based information. This will affect the way data and other elements, such as date and time, are shown in the mobohubb applications. Time zone may affect administrative tasks, so it is recommended to plan accordingly.
-
Click “Save".
-
Mark the Branding step complete (1/5).
Note: You can customize organization-wide branding separately from site-specific branding in the Site Branding section. Remember:
- Organization name = The company’s corporate name.
- Site name = The physical (or virtual) location where main activities occur.
- Next, click on “Scan Point” to proceed to the second step.
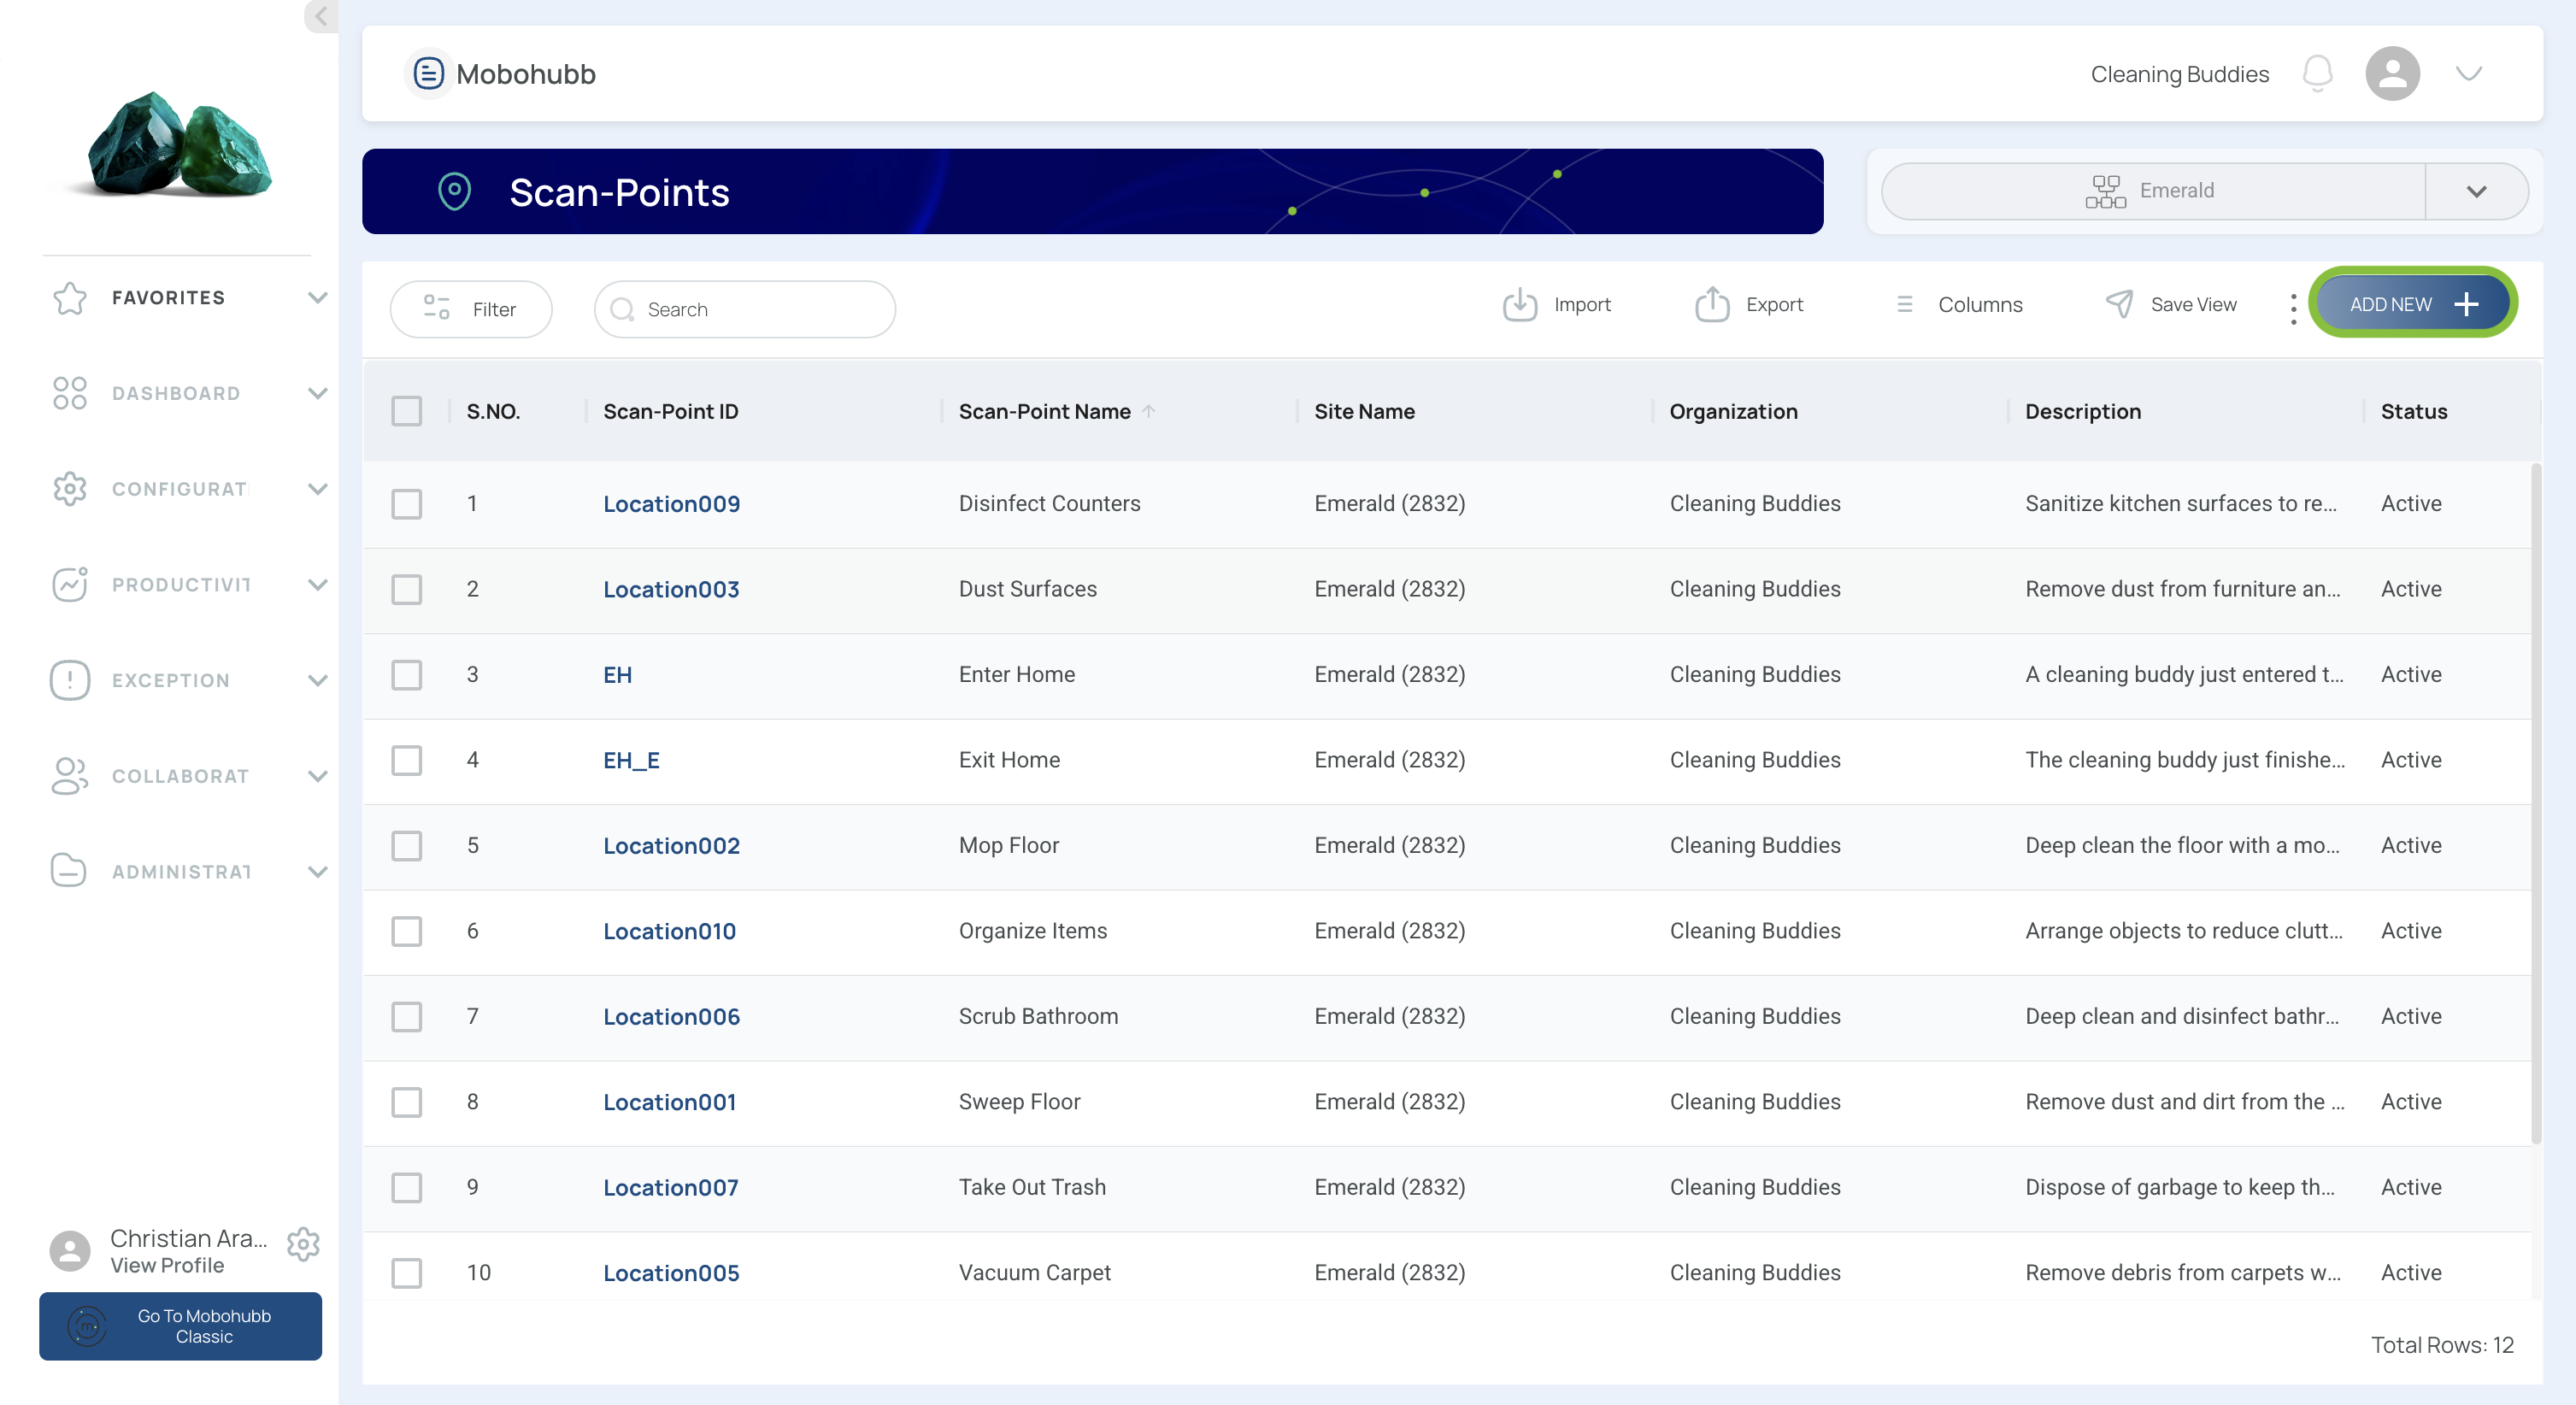
Set Up the Scan Points
A scan point is an element read by a mobile device. You can use QR codes or NFC tags, and they must be placed where you want employees to scan. Once you’ve identified your points of interest (i.e., sites defined previously), you can associate specific forms or tasks with each scan point.
Note: Think of scan points as checkpoints in your workflow. Each scan point can be configured to prompt users with a form or task, helping them complete actions and log data.
Creating Your First Scan Points
-
Add a New Scan Point, and Click the "Add New" button.
-
Fill in the necessary information.

-
-
Scan Point ID
- Assign a unique ID for each scan point that matches a specific QR. This should follow a logical sequence (e.g., sequential numbers) to keep them organized.
- Visit our QR Codes Section for details on generating QR codes.
-
Name & Description
- Name: A quick identifier (e.g., “Lobby Entrance,” “Server Room”).
- Description: Add relevant details such as room number or specific location.
-
Time Interval
- Specify how often you want users to scan this code (e.g., “01:00” = once per hour). This is required for Time Studies, a function that demonstrates the scanning frequency of QR captures that have the time interval parameter marked; for example, how security patrollers perform their patrols, scanning each time they pass by the designated locations. Time studies enable you to confirm how frequently this scan was finished.
-
Associate Tag (Optional)
- If needed, attach a predefined tag. You can create or manage tags in our Tags Section.
-
Link to a Task or Form (Optional)
- You can associate the scan point with an existing task or form. To mark that task or form as complete, the user must scan the point. This ensures the activity is tracked and verified in the system.
- For initial setup, you may choose None until tasks/forms are ready.
-
Activate the Scan Point
- Check the box to mark it as active.
-
Save
- Click “Save” at the bottom of the form to finalize.
Note: Repeat this process for each location or checkpoint where you need a scan point. Once finished, mark the second step complete (2/5).
- Click on "Task" to proceed.
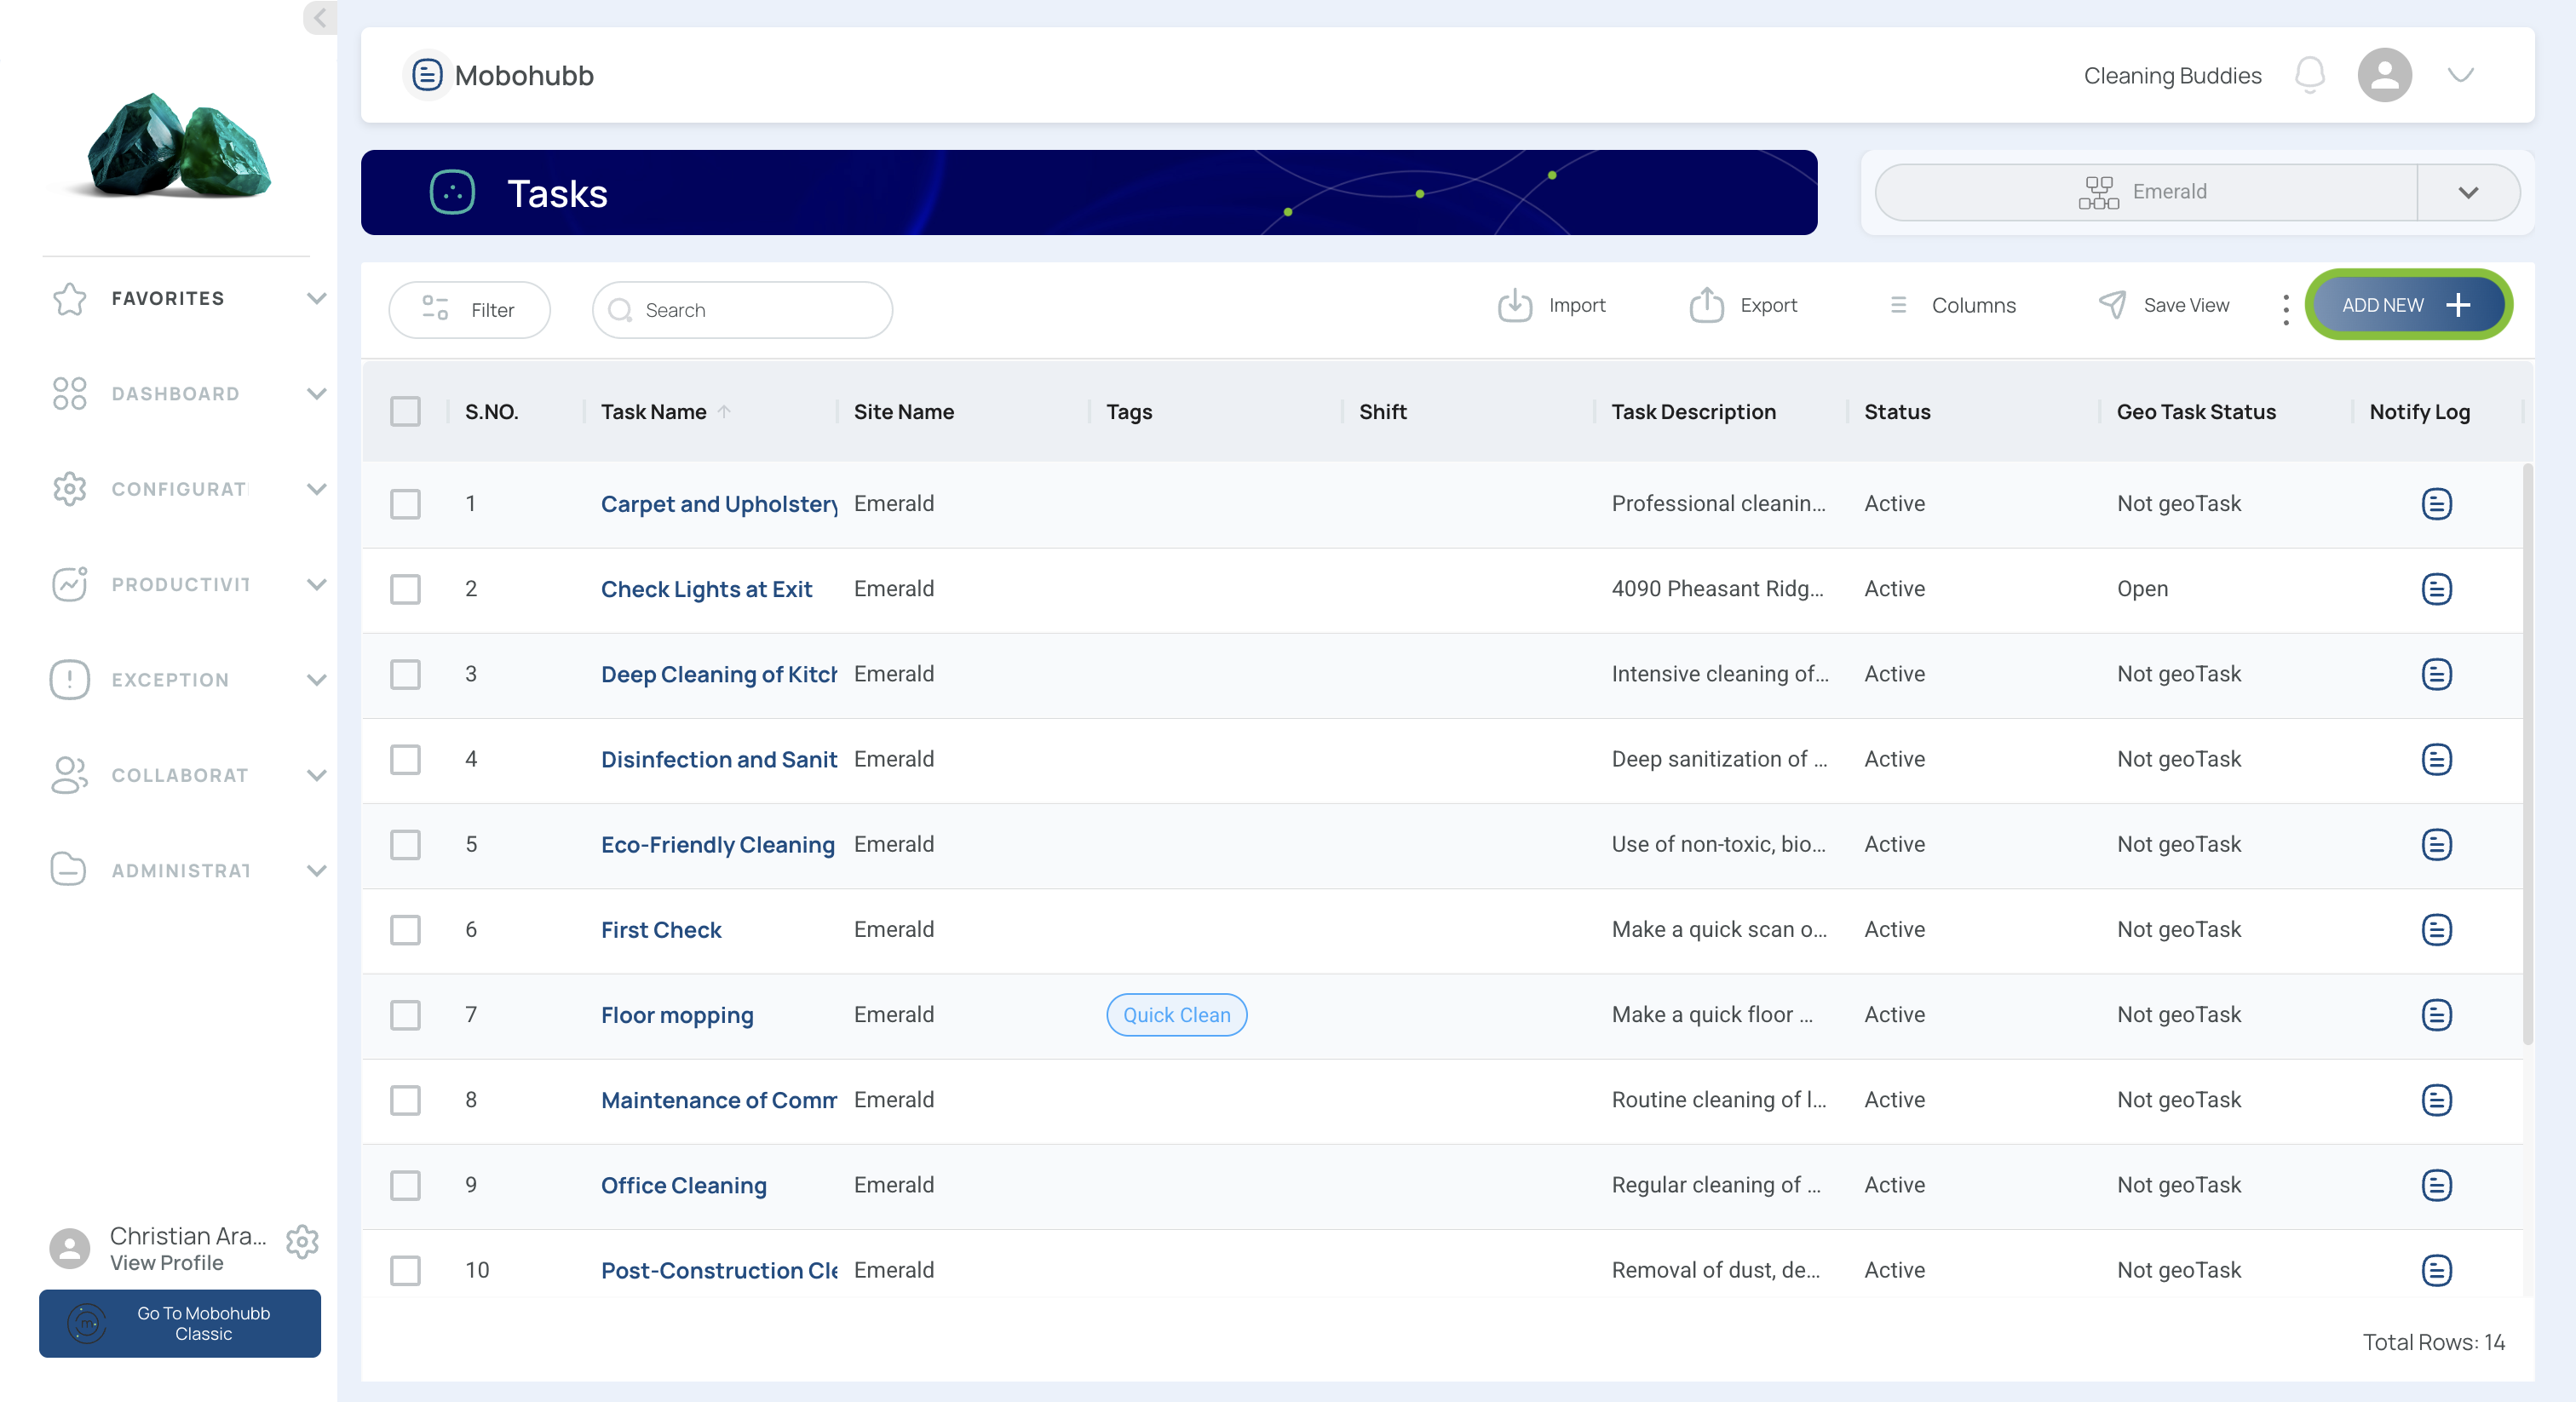
Configure Tasks
Tasks represent the specific activities or goals workers perform. Each task can be assigned to one or more users, linked to a specific location, or associated with a category like a scan point (QR/NFC), which helps track attendance, time, and place. You can also enable a report feature to collect and manage data (e.g., work orders, checklists). Find a complete guide to create and manage tasks in ourdedicated guide.
-
Add a new task
- Click the “Add new” button.
-
Open the task form & name the task
- Give the task a descriptive name.

-
Add a sequence
- Use a unique, sequential number to order and identify the task. This will affect the order of appereance in the Mobile App; if left blank, tasks appear in alphabetical order.
-
Associate a predefined tag (Optional)
- For the initial setup, you may skip this unless you’ve created tags (via the Tags Section).
-
Assign users
- Select the individuals or groups who will perform this task. If left blank, the task will be available for all site users.
-
Task description
- Provide details (e.g., location, relevant instructions).
-
Choose the task type
- Scan: Requires scanning a QR code or NFC tag.
- Report: Links to an existing form (created beforehand) to gather data.
- Manual: Appears as a simple checkbox in the app.
Note: If using a Report task, make sure the form already exists so you can select it from the dropdown.
-
Enable GPS: Converts this task into a GeoTask, meaning it requires a location (GPS) and must be set to Report. Once activated:
- The “Task Description” field becomes “Address” so you can define the coordinates.
- The task type is locked to Report—you must link it to an existing form, making it mandatory.
- This setting is not optional if you want a geo-based task: enabling GPS forces the task to require a report and location data.
-
Save
- Click "Save" at the bottom of the form to finalize.
Note: Repeat this procedure for each task. When finished, mark this step complete (3/5). You’re now one step closer to fully setting up your mobohubb portal!
- Click on "Form/Checklist" to proceed.
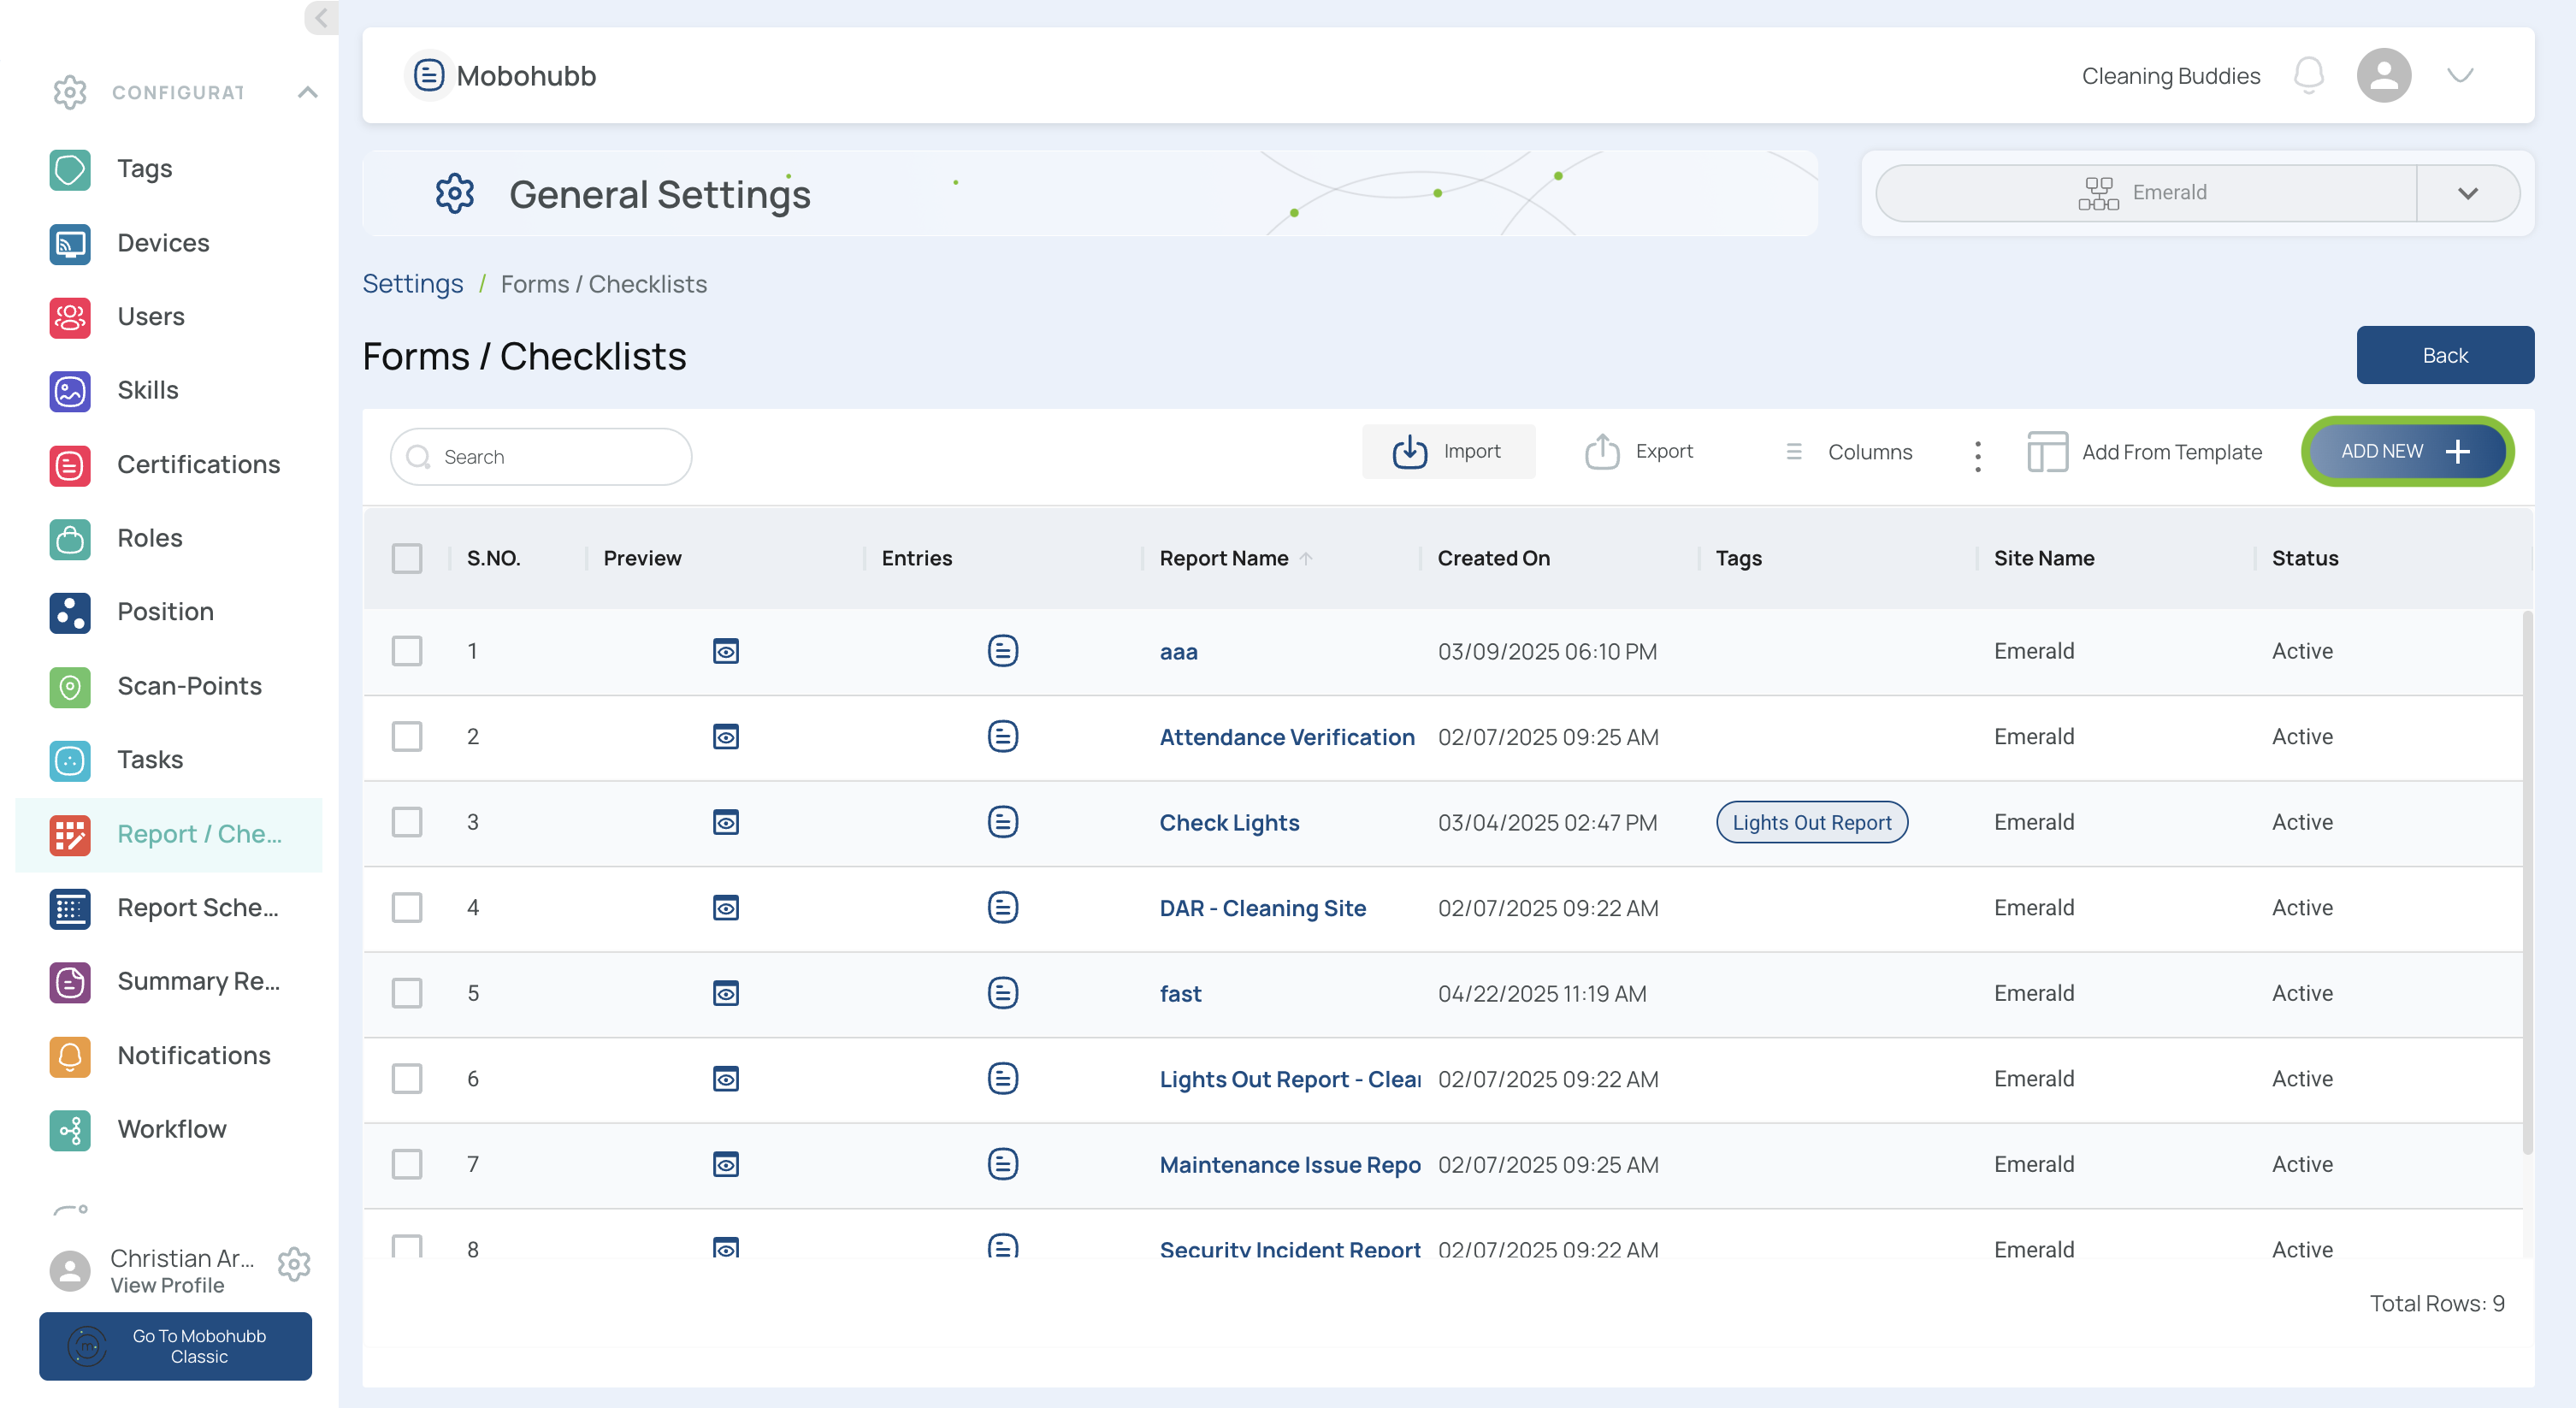
Create Forms and Checklists
Forms and checklists help collect and track information. A form is a digital document that gathers data in a structured way, while a checklist is a detailed sequence of tasks or items to check off. Find a complete guide to create and manage tasks in ourdedicated guide.
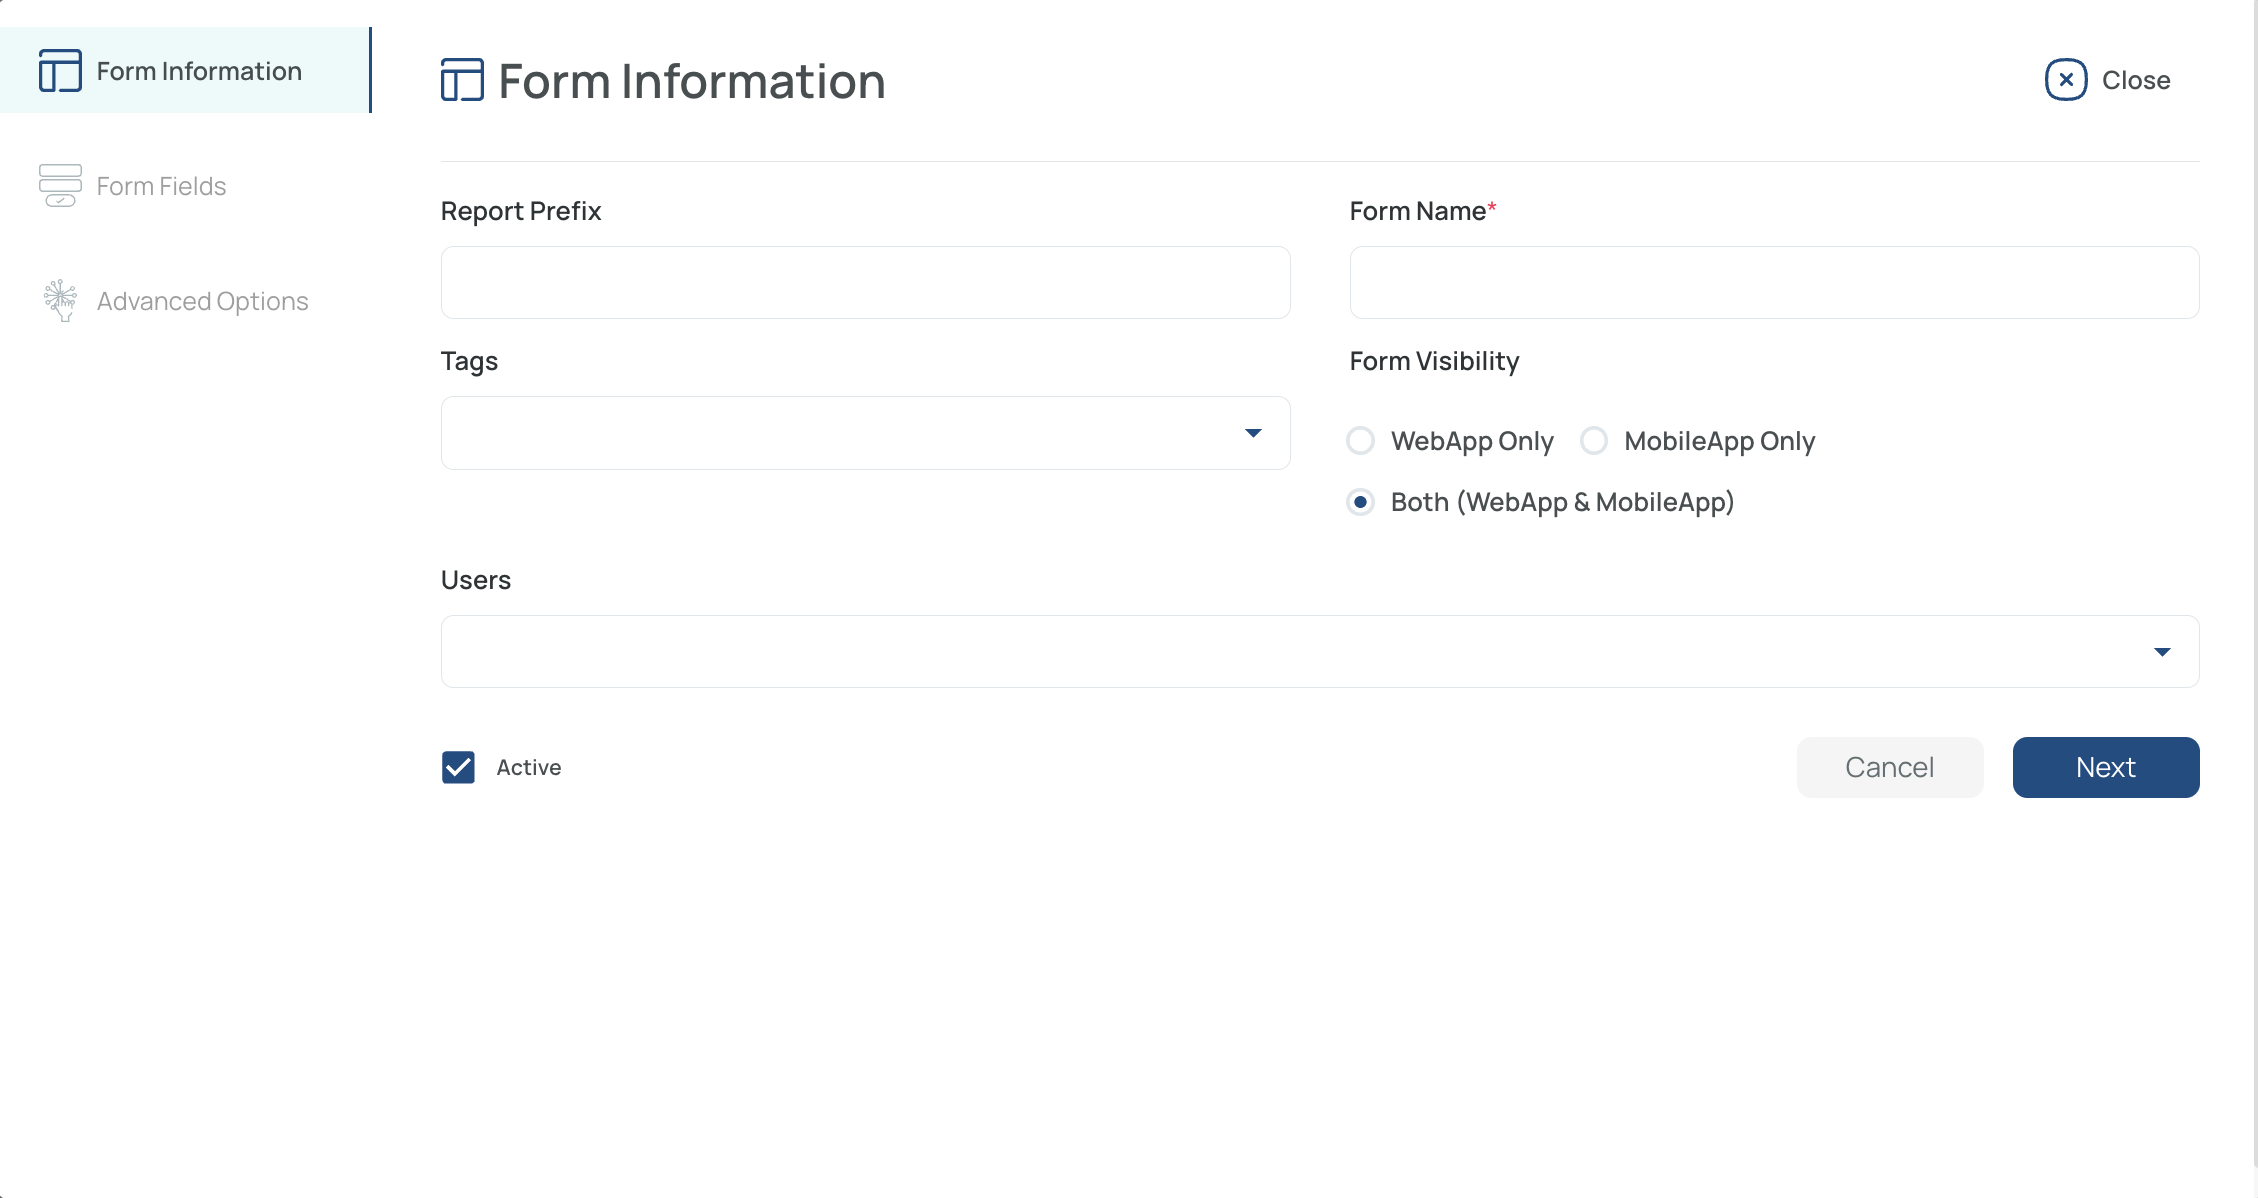
Form Information
-
Add a new form
- Click the “Add new” button on the right side of the interface.
-
Fill in the Form Information
-
Prefix: A short, unique code (letters, numbers, symbols).
-
Name: The form’s title should be clear and descriptive.
-
Tag: Select a predefined tag if needed.
-
Visibility: Choose web app, mobile app, or both.
-
Assign Users: Decide who can complete this form (individuals or groups). If left empty, it will be available for everyone.
-
Activate: Check the box to enable the form immediately or leave it unchecked to hide it.
- Click “Next” to Go to “Form Fields”
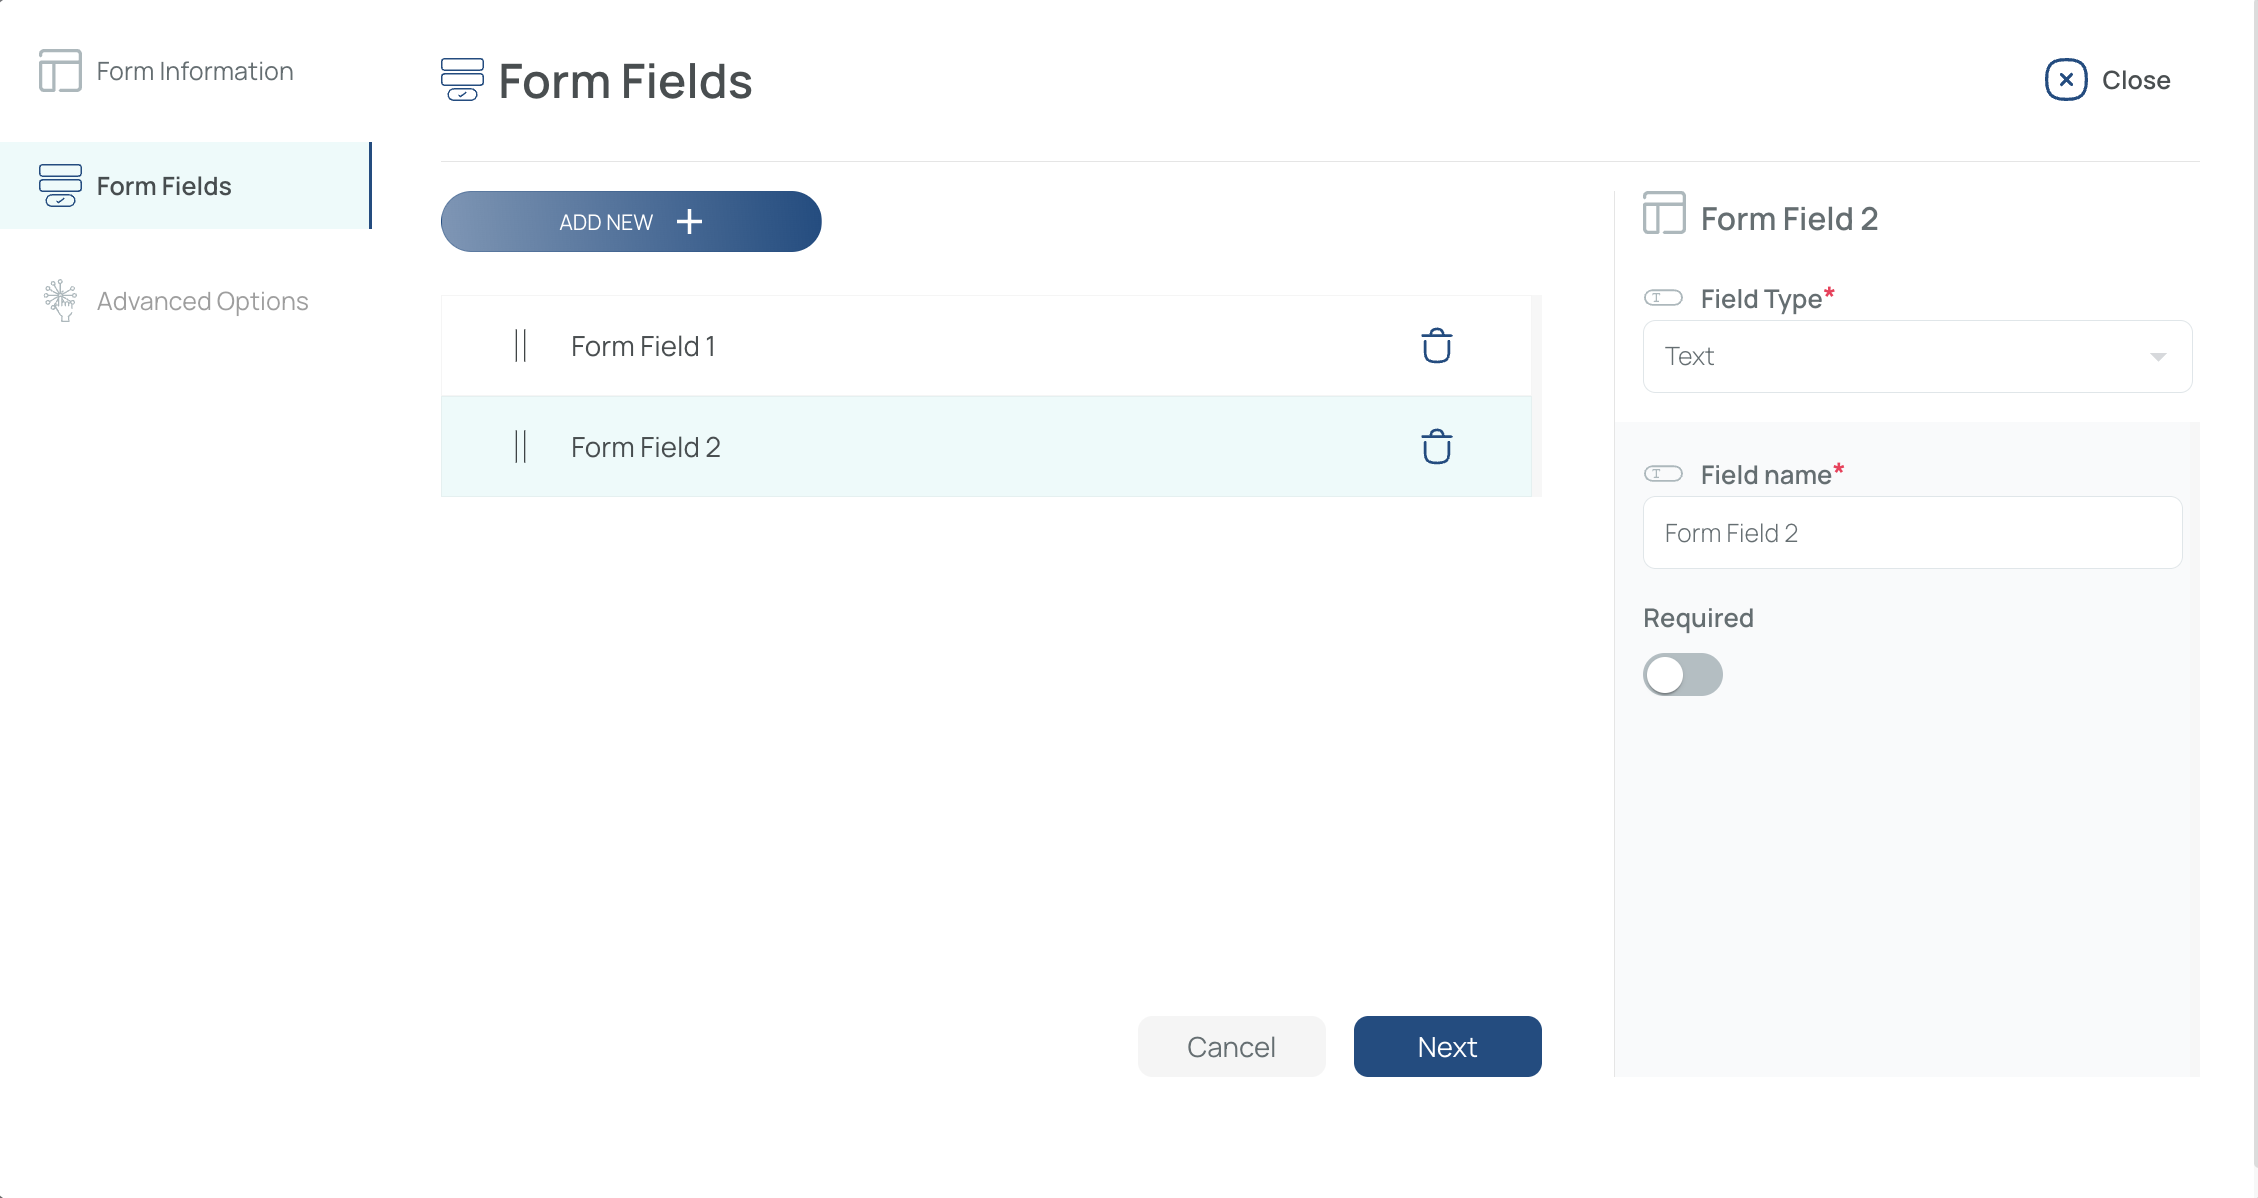
- Fill In the Form Fields
-
Add New Fields: By default, one field exists. Click “Add new” to add more.
-
Configure Field Type: Choose from text, date, time, select, checkbox, radio, signature, scan, etc.
-
Field Name: The label visible to users (e.g., “Employee ID,” “Comments”).
-
Required: Mark fields as required (checkbox) or optional.
-
Conditional Fields: For Select or Radio types, activate “conditional” to display additional fields based on user choices.
- Click “Next” to Go to “Advanced Options”
- Fill In Advanced Options
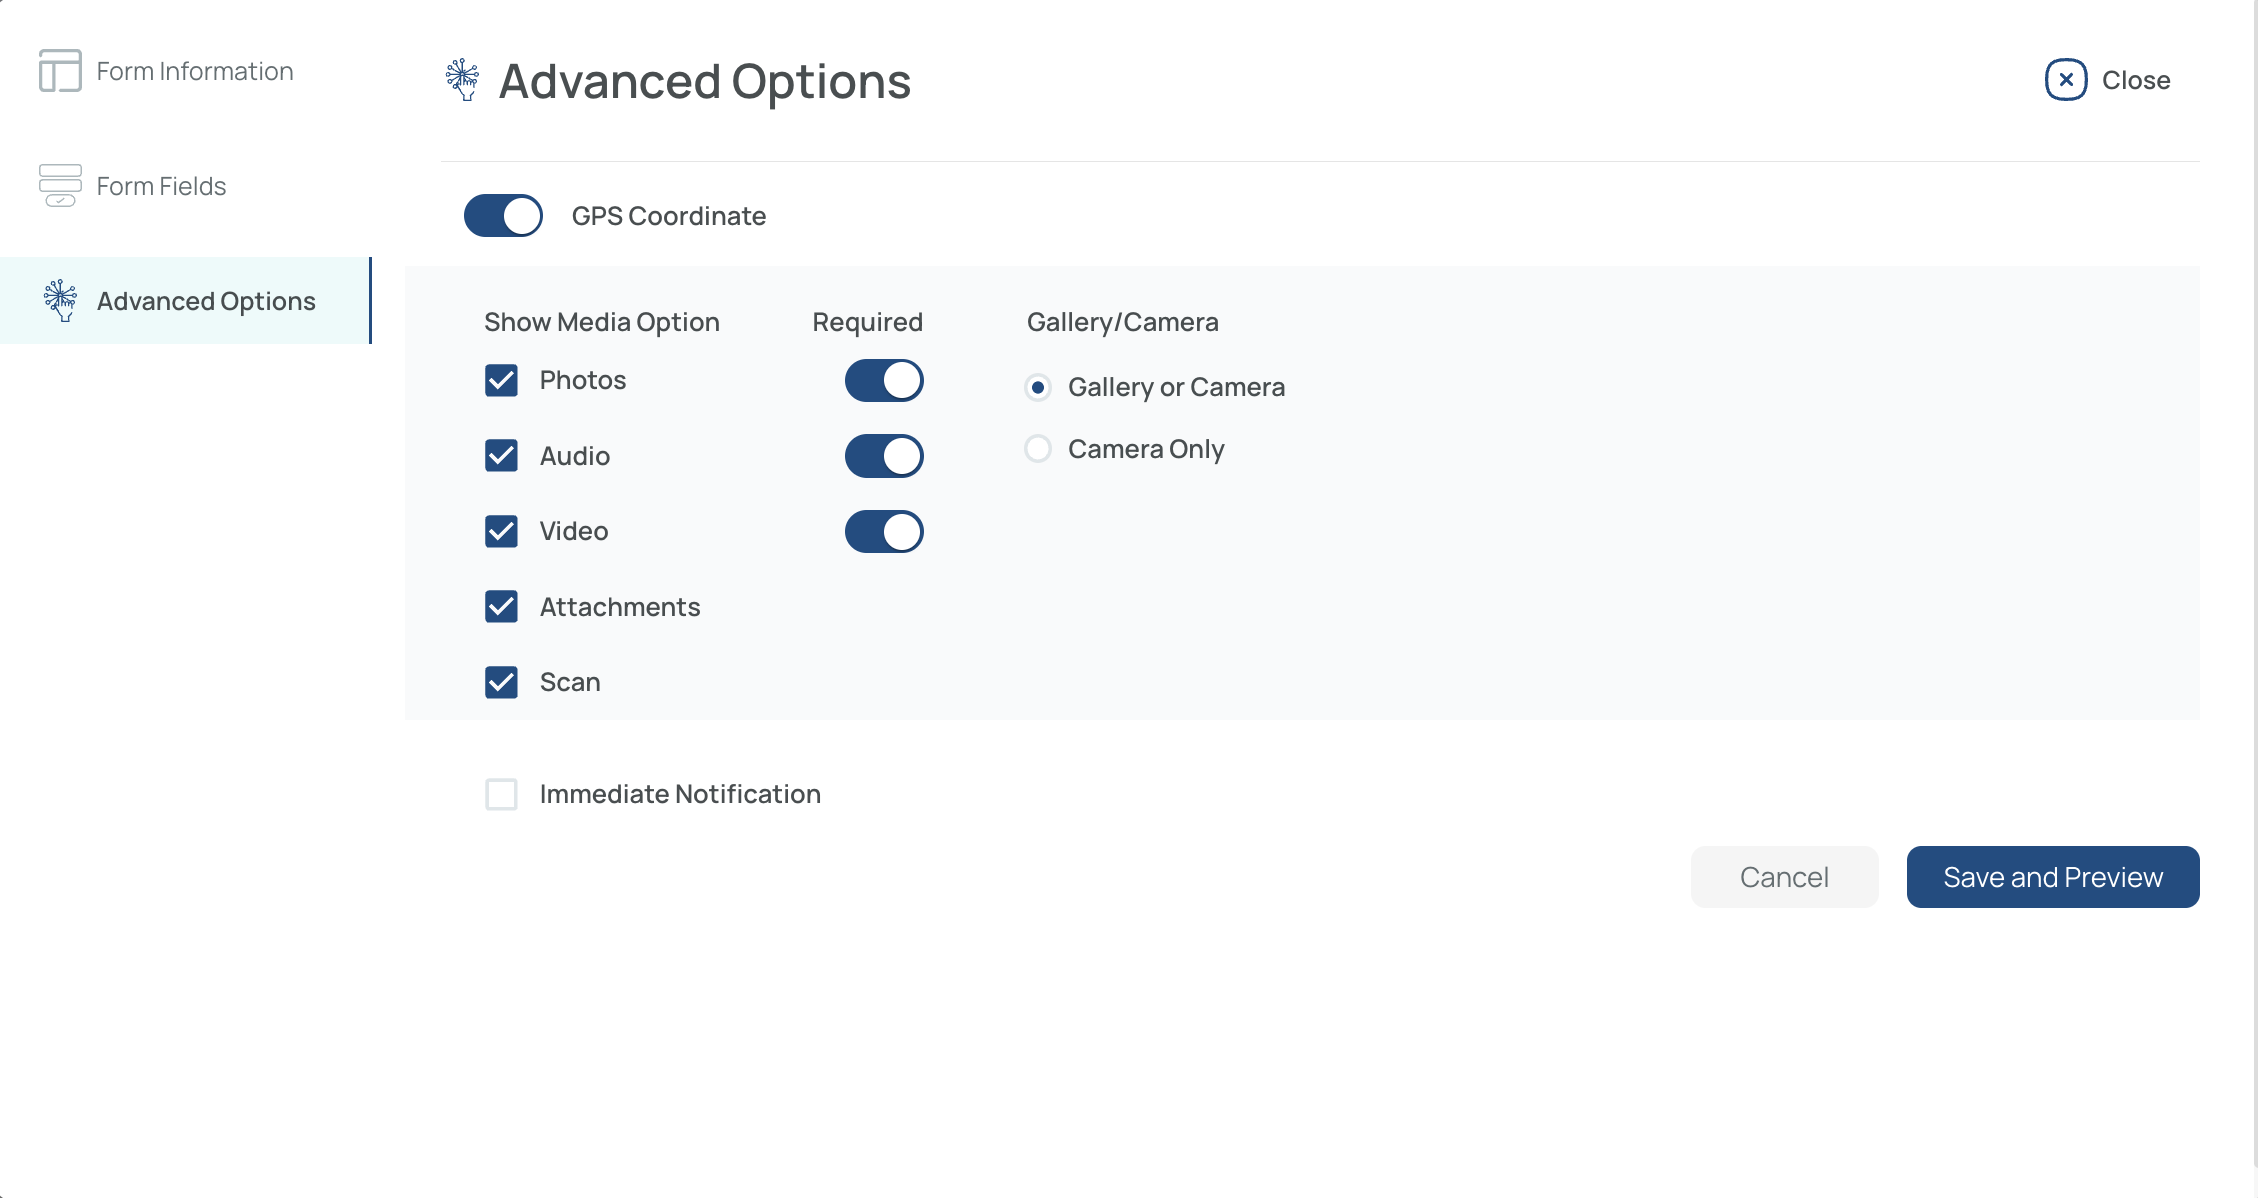
- GPS Coordinate: Enable or disable geolocation for your form.
- Media Options: Allow photos, audio, video, attachments, or scans.
- Mandatory Media: Check if a photo/audio/video is required or optional.
- Camera/Gallery: Let users capture media with their device or choose from gallery (or camera-only mode).
7.Immediate Notification (Optional)
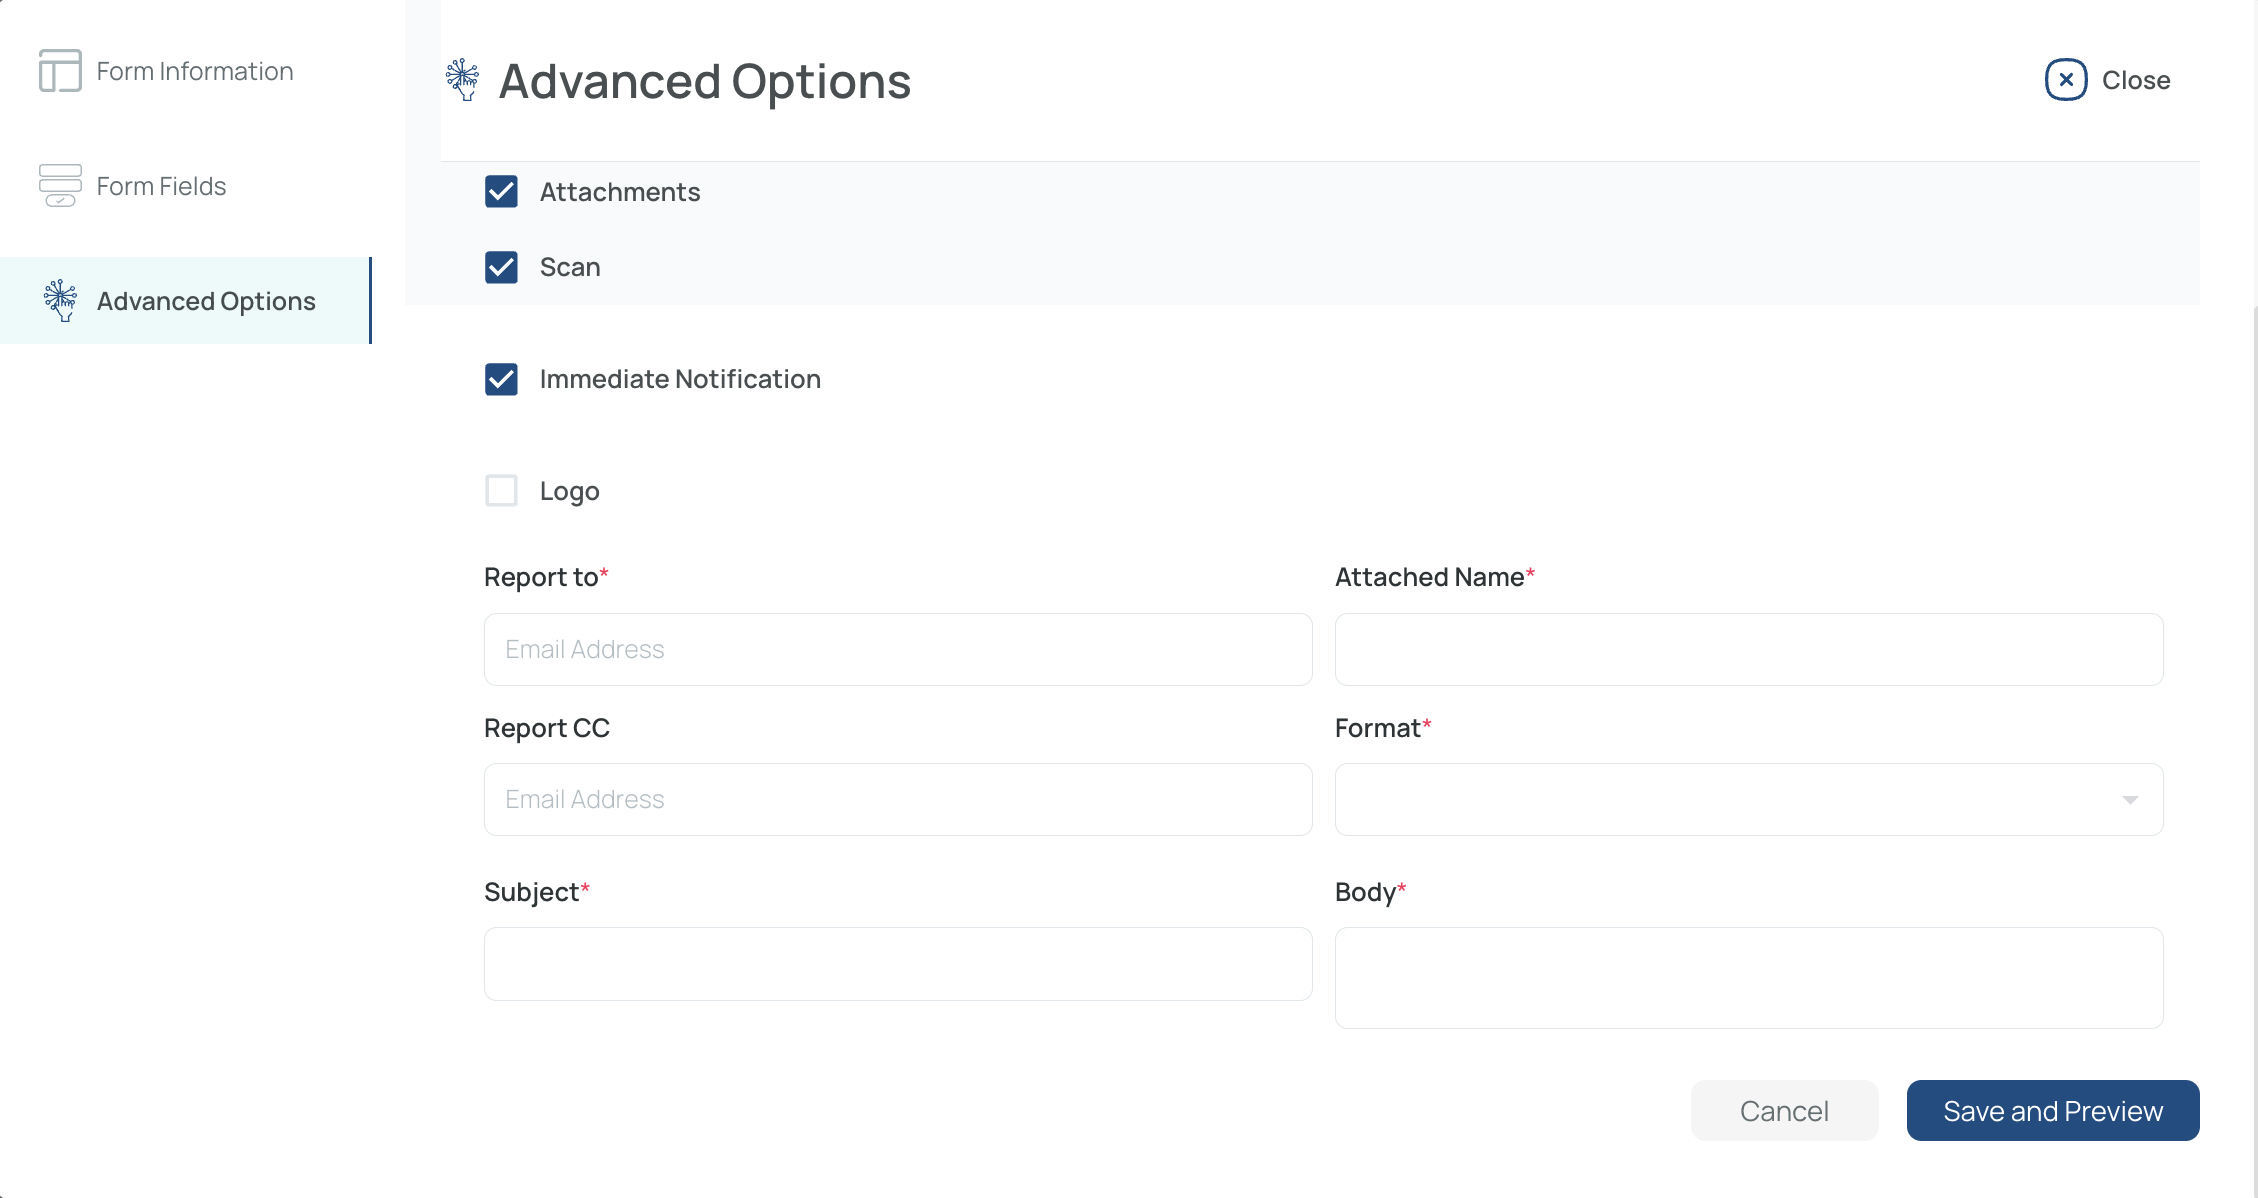
-
Sends an email alert upon form submission.
-
Specify recipients, subject, body, format (PDF, HTML, Excel), and attachment name.
-
Save and Activate Preview
- Finalize your form settings and see how it looks (especially on mobile).
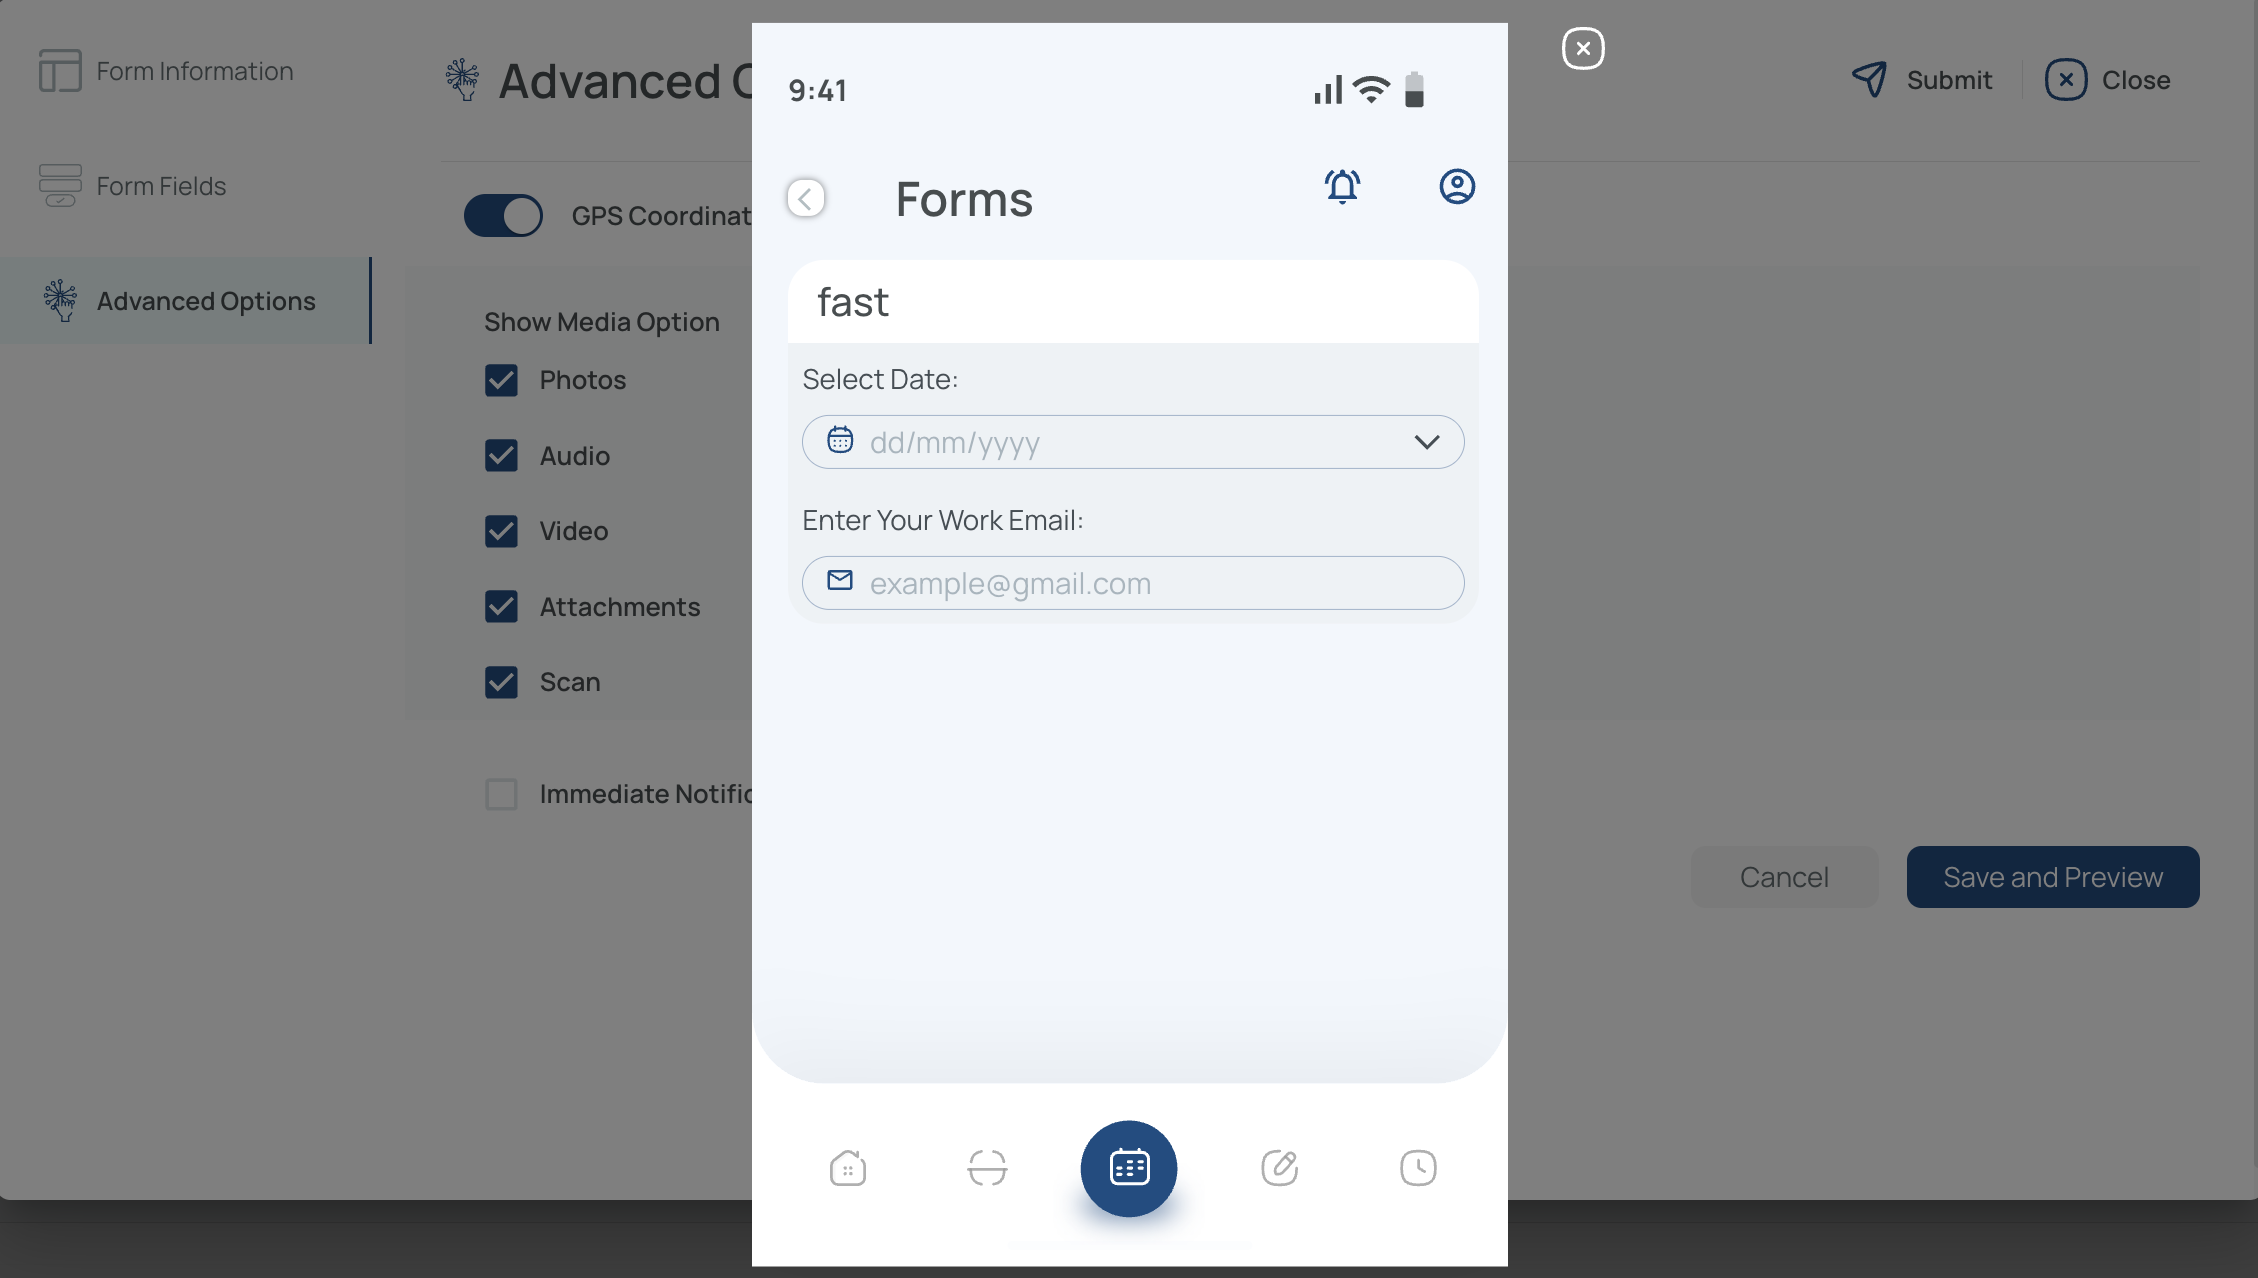
Note: The preview reflects how your form or checklist will appear in the mobile application.
-
Note: After creating your forms or checklists, mark the fourth step complete so the setup indicator shows 4/5.
Click on “Invite your team” to move to the final step.
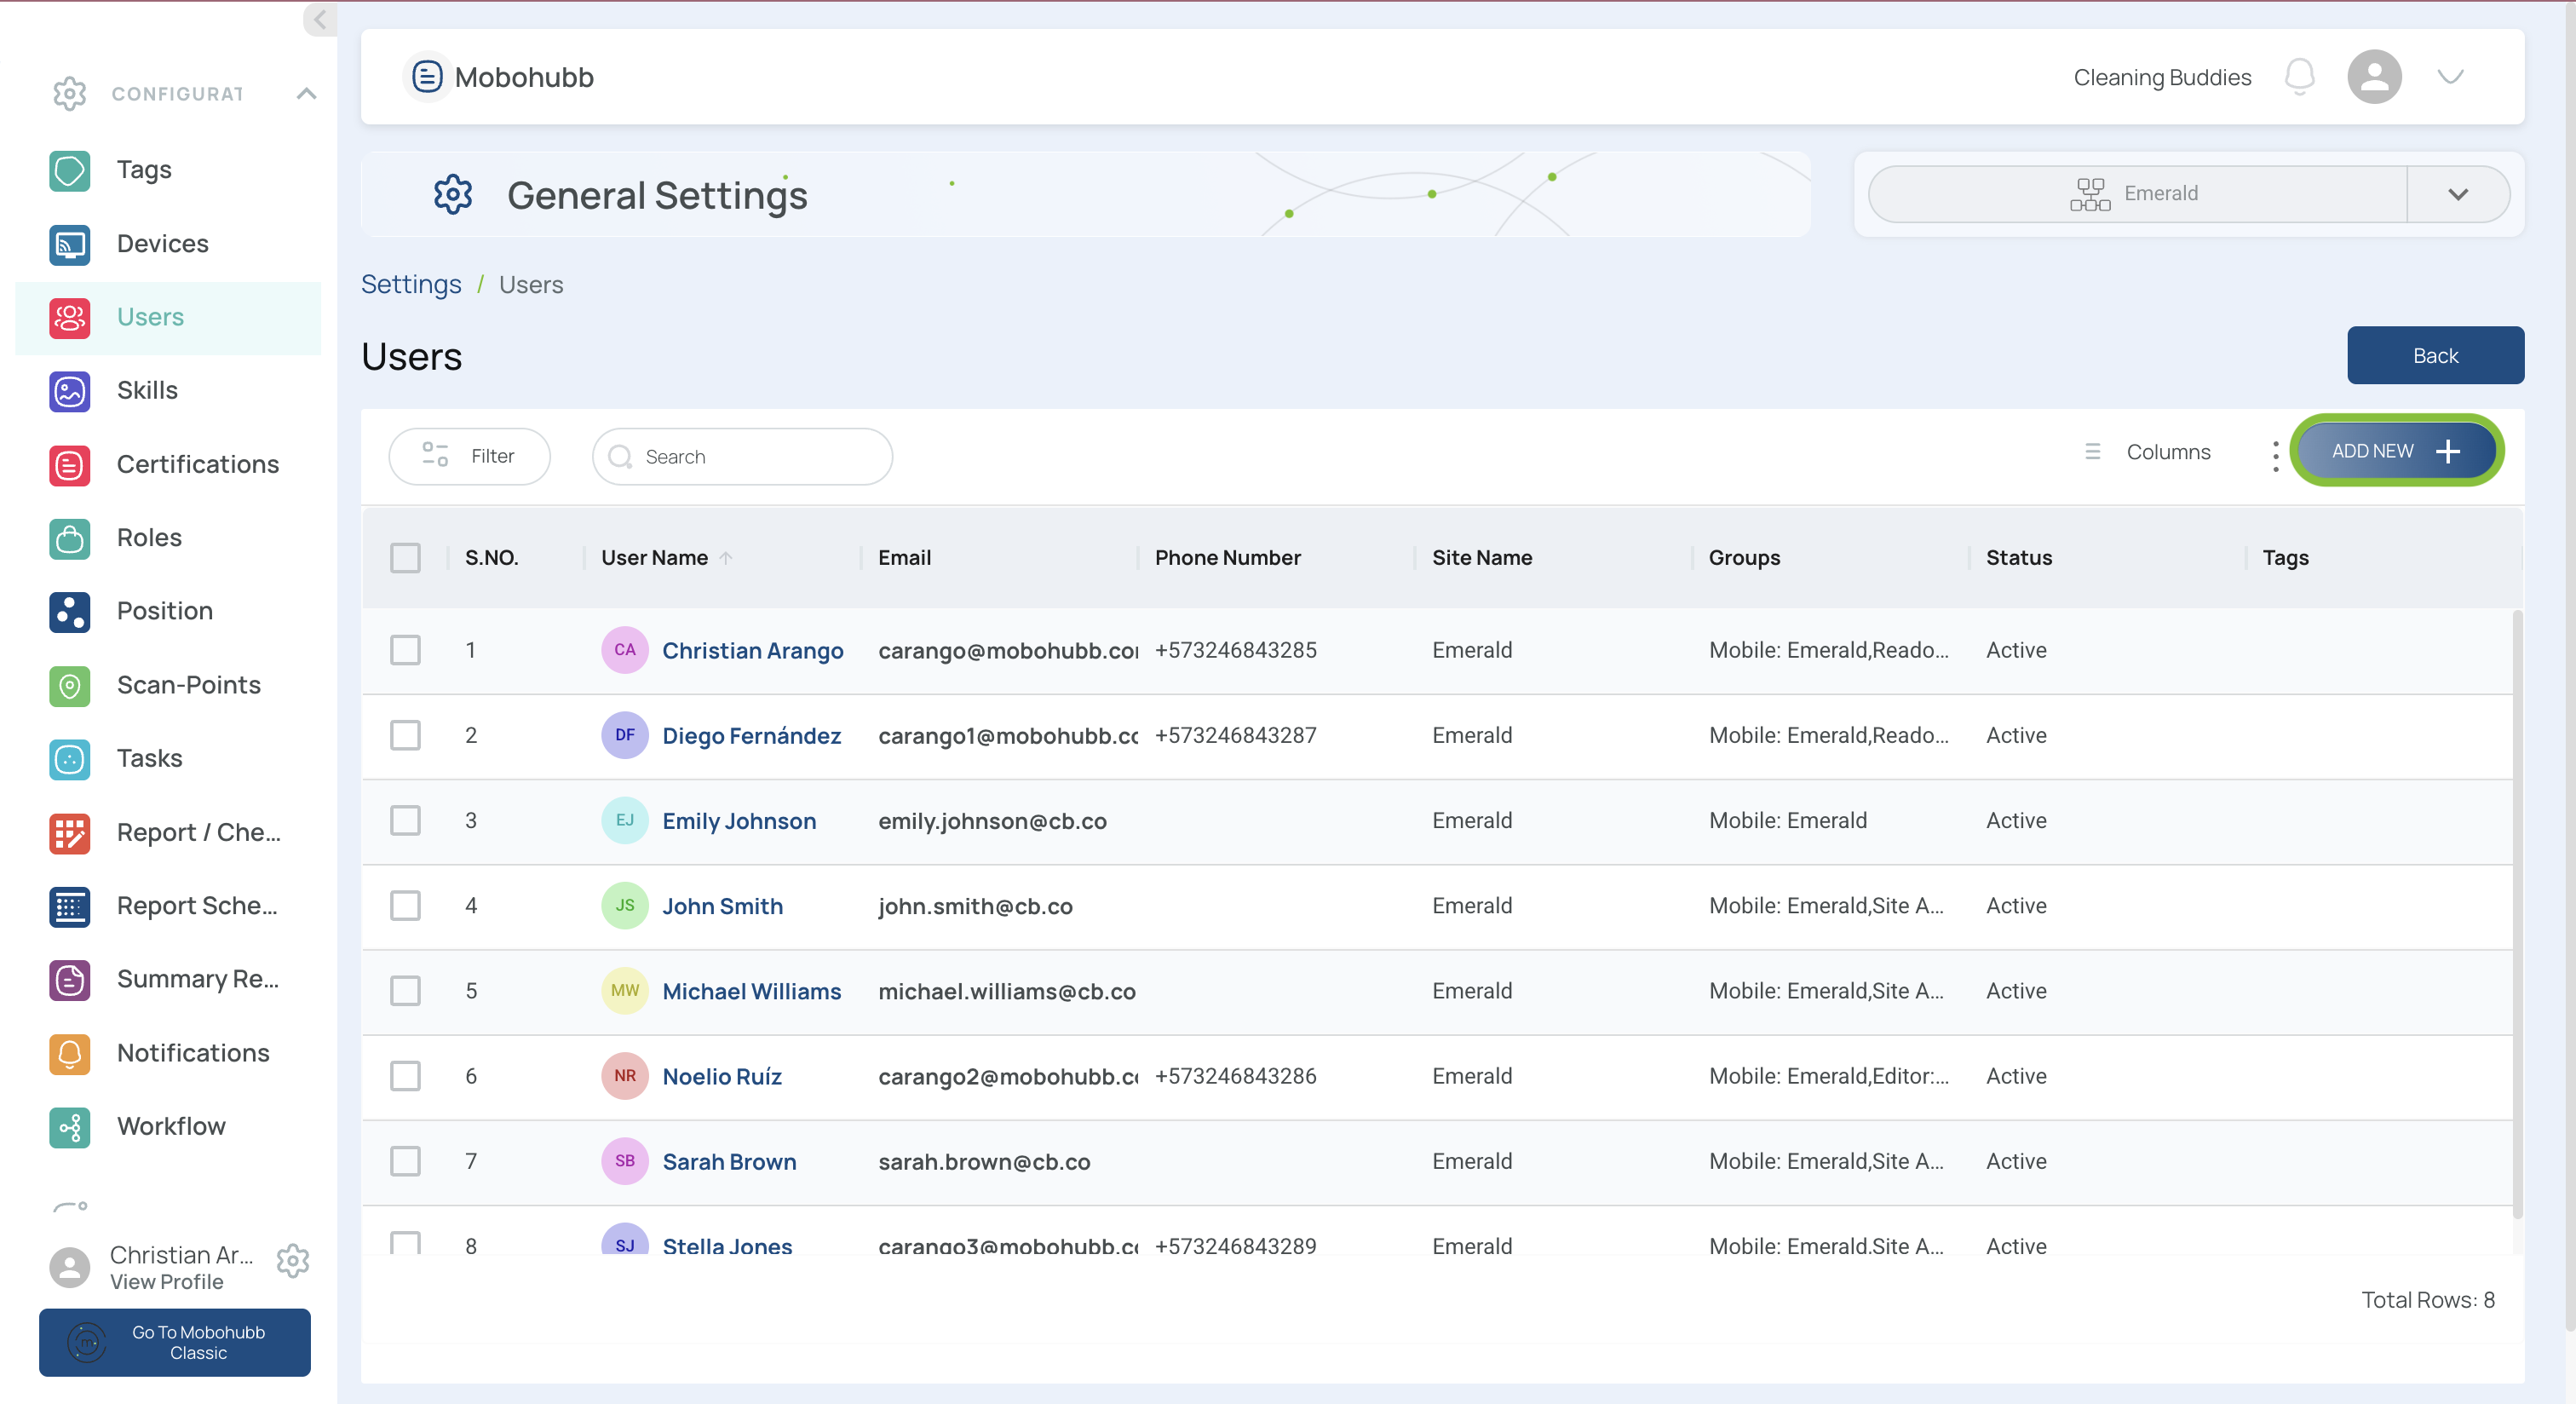
Invite Your Team
Inviting users is the final step in setting up your mobohubb environment. By assigning roles and permissions, you can segment access across different sites and maintain an organized structure.
- Go to the Users section and click the “New User” button.
- Enter the data of the new user and fill in the first name and last name fields.
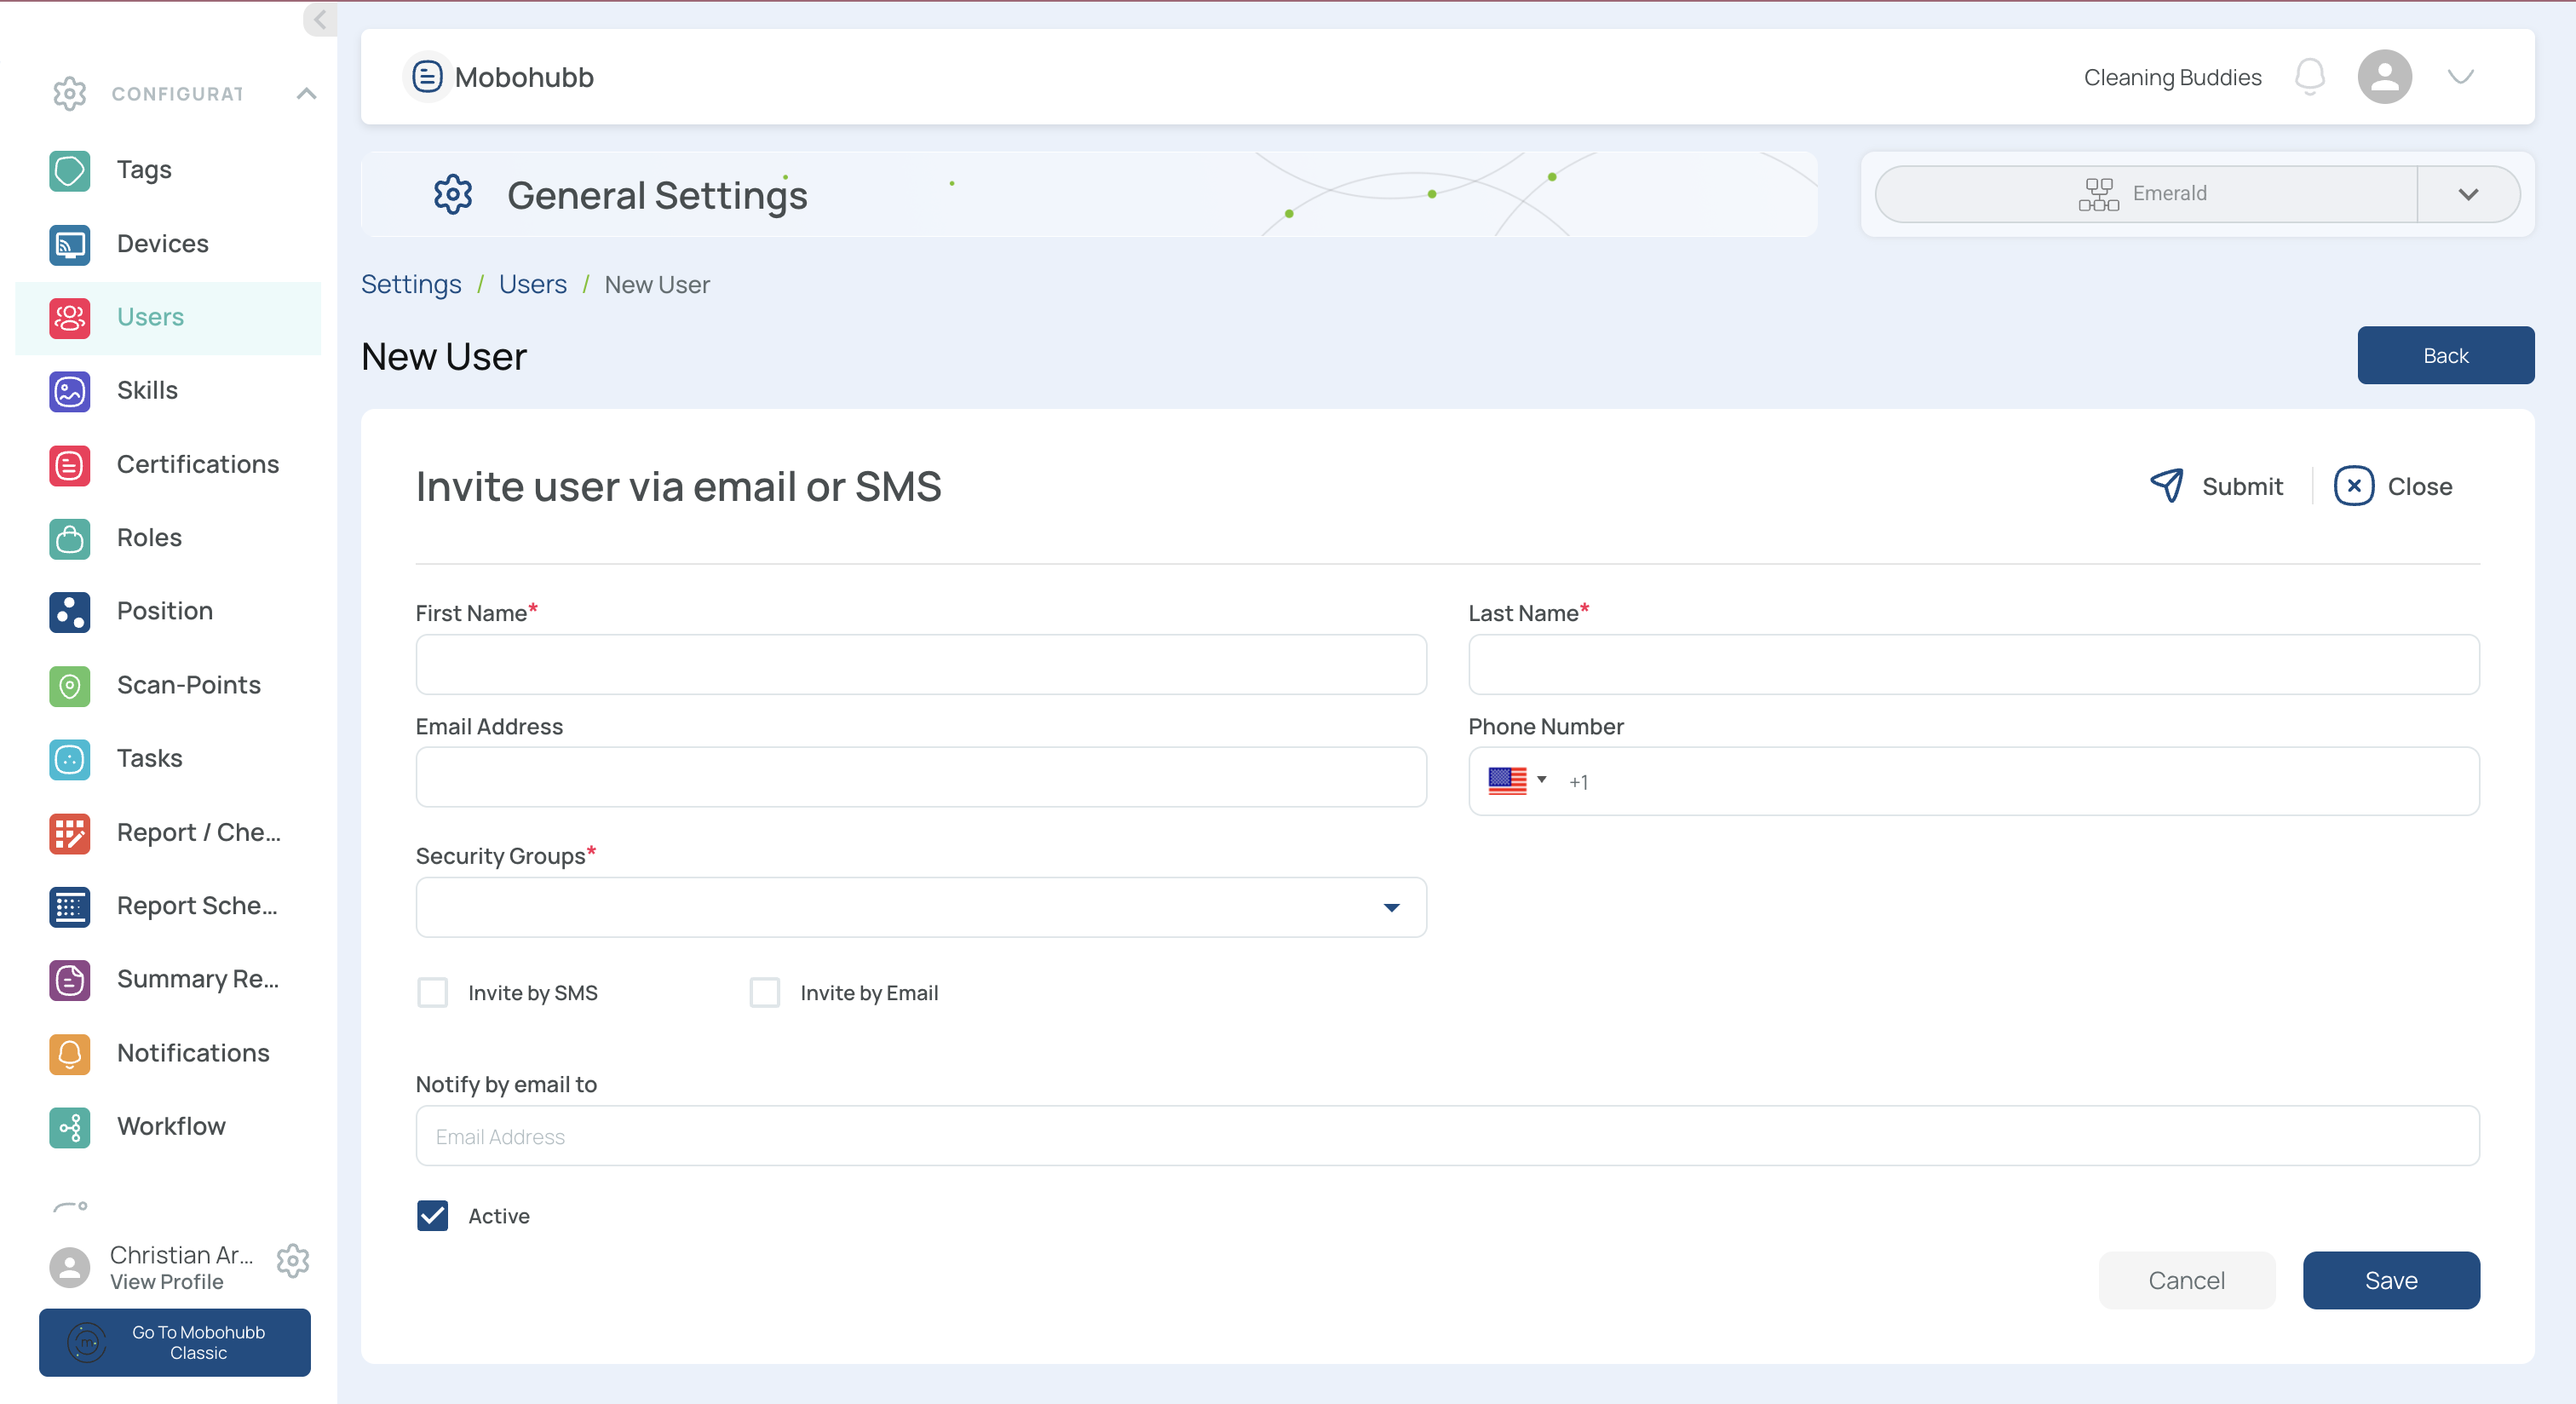
- Fill in the phone number and email address fields. The phone number will be used to receive SMS.
Note: The user’s email address will be the username.
- Choose the security group from the dropdown menu.
- Choose between invite by SMS or by email by checking the box.
- The user will receive an email or SMS with a link to confirm registration.
- Use the “Save” button at the bottom of the form to store the user’s data.
- Repeat these steps for each additional user.
Some organizations have employees at multiple sites. Assigning unique roles at each site helps segment and manage permissions securely.
Security Groups
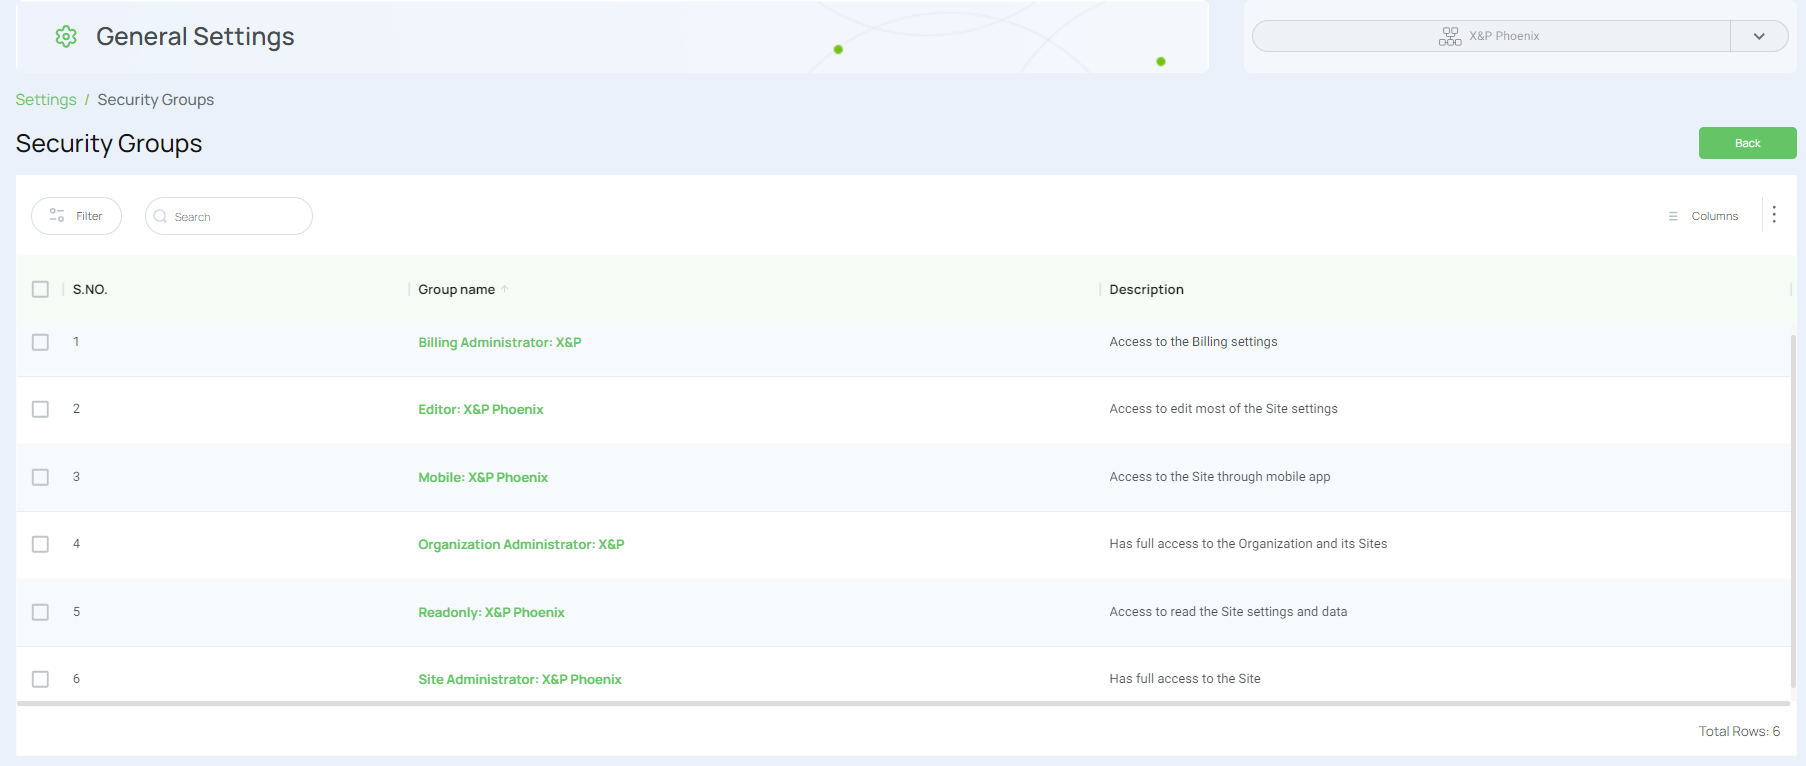
mobohubb offers several security groups to define user roles:
- Organization Administrator: Has full access to the organization and all its sites.
- Site Administrator: Manages all settings for a specific site but cannot alter other sites.
- Billing Administrator: Manages subscription and billing-related settings.
- Editor: Can edit most settings in the mobohubb portal.
- Read-only: Can view site settings and data but cannot modify them.
- Mobile: Uses the mobile app for tasks like scanning QR codes and filling out reports, but does not have access to the portal.
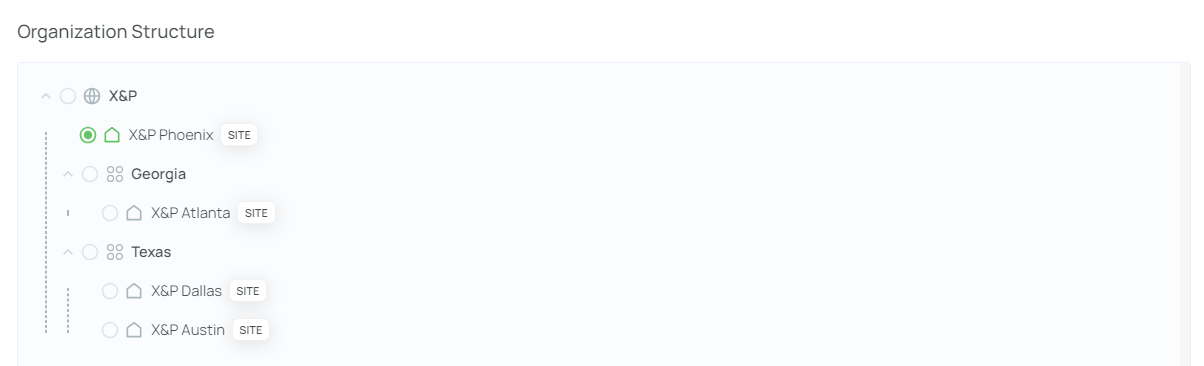
Organizational Structure
"Organizational structure" in mobohubb refers to the hierarchical (or tree) arrangement of your company’s sites. This structure is designed purely for grouping and visibility, allowing you to organize sites in a way that reflects your company’s operational divisions. It facilitates the easy management of roles, rapid onboarding of staff, and clear segmentation of data across multiple sites.
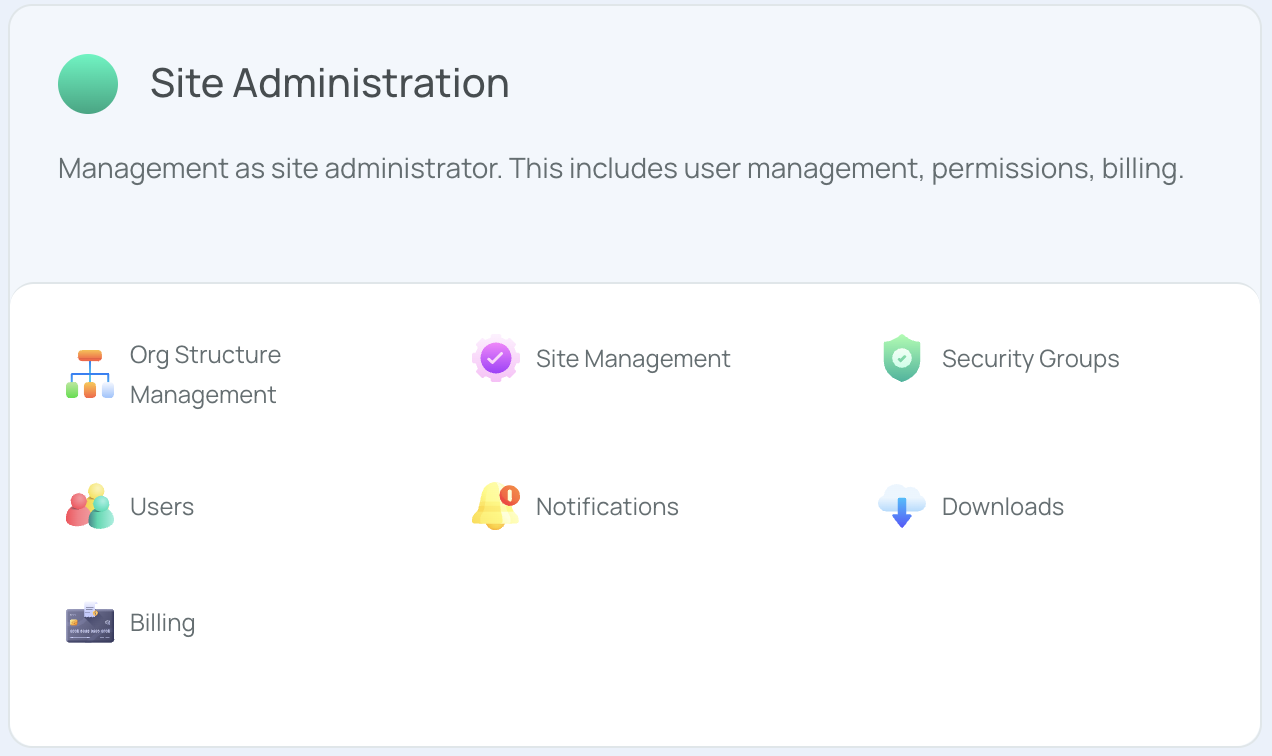
You can configure your Organization Structure from Settings→ Sites Administration → Org Structure Management.
Note: Once you have invited your team and assigned appropriate roles, mark the fifth and final step complete so your setup indicator shows 5/5. After this, the walkthrough will no longer be visible.

Your new mobohubb environment is now fully configured and ready to use!